Setup the Rendering
We’ll first discuss the raw effect of setting up the main engine rendering options in this chapter on the generated image. Then, we’ll discuss on establishing simple rendering presets (low, medium, high for instance) that may be useful for end users that are not skilled in computer graphics and that don’t want to spend time in tuning options.
Ray-Tracing Options
First options to be set when a photo-realistic image is to be calculated are the ray-tracer options. We mainly have three effects to deal with here:
- Reflections
- Refractions
- Shadows
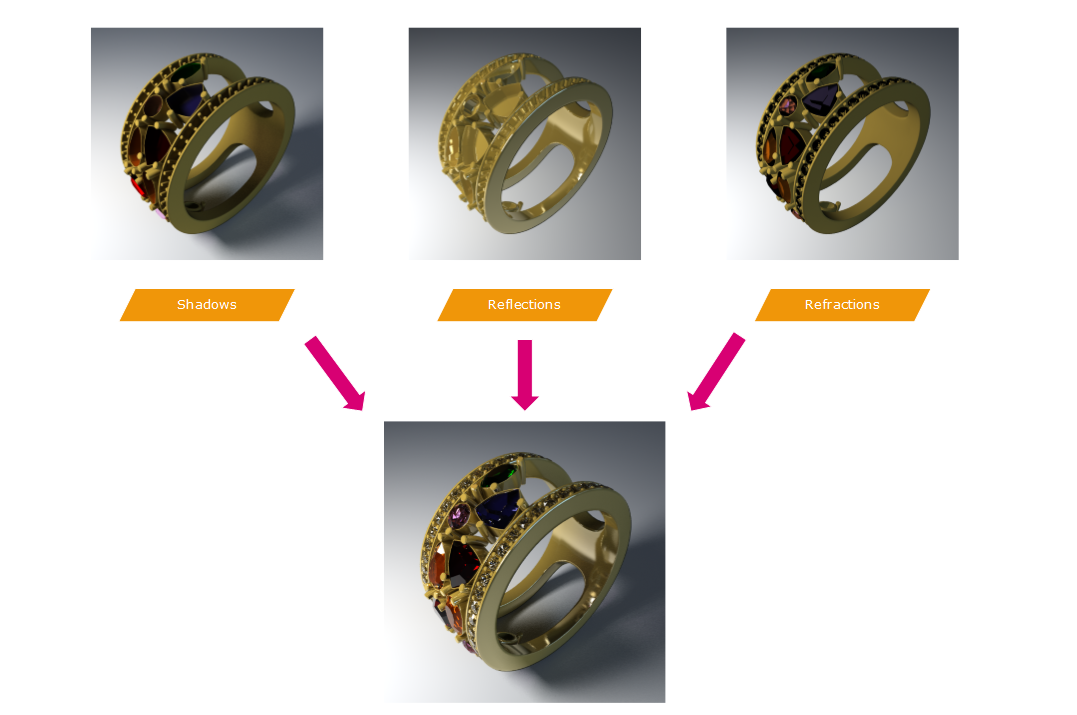
Decomposition of reflection, refraction and shadow contributions.
Refractions can be pure refractions or transparencies. In the case of photo-realistic images, all transparent objects should use refractions, as there’s almost no transparency in real-life. There may be media with refraction indices (IOR) close to 1.0 but except for the air, it’s rare enough for us to consider all transparent media as casting refraction rays.
Each of these effects in HOOPS Luminate is ruled by a ray propagation depth. The depth of a ray in classic ray-tracing is defined by a ray-tree, as illustrated in the image below:
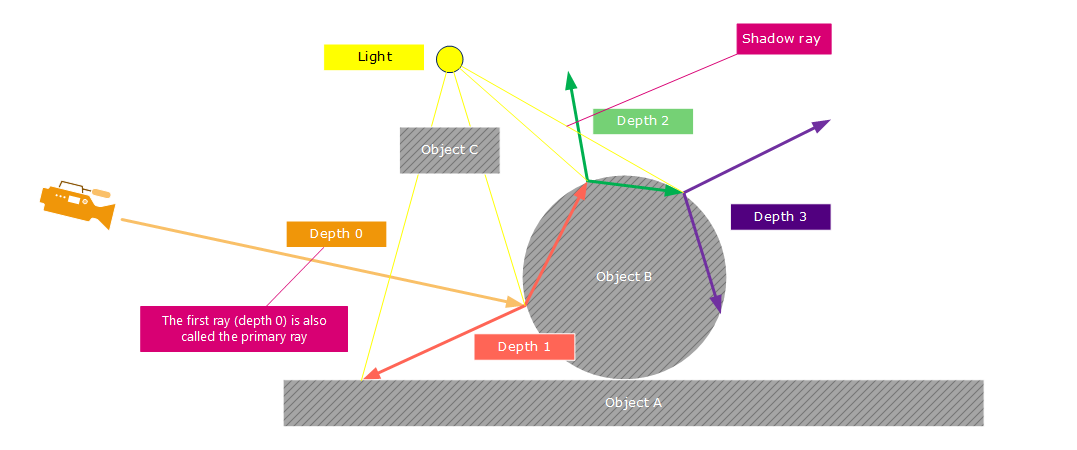
Reflection, refraction and shadow ray-tree.
The primary ray is a ray fired from the camera position through a screen pixel toward the scene. A secondary ray is one of the reflection, refraction or shadow rays, that are illustrated in the image above at depths 1, 2 and 3. Each hit of a ray at an object interface may cast an additional reflection and refraction ray, depending on the material property of the hit object. In our illustration above, the primary ray (orange ray depth 0) hits Object B and 2 more rays are fired from here: a reflection and a refraction ray (depth 1). This process recursively continues when rays hit surfaces. The process ends when the maximal allowed depth is reached or when there’s no hit geometries or when hit objects don’t emit reflection or refraction.n n
In addition to this we see the yellow rays which are shadow rays. These rays are fired at each hit point to determine the lighting contribution to be considered. We see that for the reflection ray at depth 1, the shadow ray is obstructed by Object C. Therefore, no light contribution will be visible for this ray.
Therefore, to summarize the option setup for our image above, we would need:
RED::OPTIONS_RAY_REFLECTIONSset to 3RED::OPTIONS_RAY_REFRACTIONSset to 3RED::OPTIONS_RAY_TRANSPARENCYset to 3 (mimics the refraction depth)RED::OPTIONS_RAY_SHADOWSset to 4. Plus one here! The shadow ray is a ray cast at a greater depth than the ray it comes from!RED::OPTIONS_SHADOW_MAP_DEPTHset to 4 (mimics the shadow depth for lights casting shadow maps instead of ray-traced shadows)
Global Illumination Options
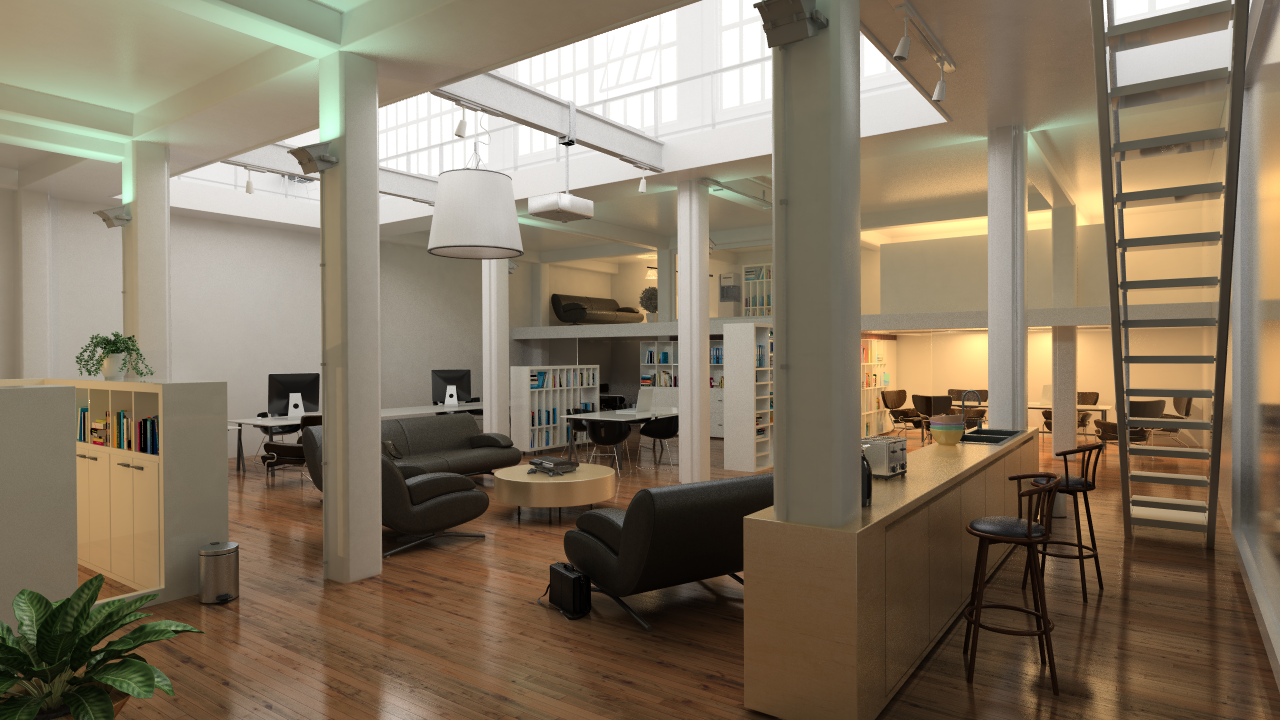
The next critical parameter to turn on is global illumination. Global Illumination (GI for short) is a must have for the generation of any high quality image. If we look back at the heading scene of this book, we can see the GI contribution if it’s enabled:

The major contribution of global illumination in an indoor scene.
Global Illumination calculate the indirect contribution of the scene lighting at each visible point in the image. Therefore, the setup of GI is really important for indoor environments where many parts in the image are not directly lit by any light. Using HOOPS Luminate, turning on global illumination is performed by the enabling the GI option:
RED::OPTIONS_RAY_GIset to true.
Rendering Presets
This is an important part in a rendering application: an easy configuration must be proposed to end users to generate ‘one click’ images, without spending time in tuning the rendering engine. We’ll focus on the definition of three rendering presets here:
- 1: Low; Low quality, high speed rendering
- 2: Medium; Average quality, average speed
- 3: High; High quality, slow
Almost none of the options mentioned above have an impact on performance. Reducing the rendering depth in the ray-tree may speed-up the rendering a bit, but the time is not consumed here, as most rays are generally extinguished after 3 or 4 bounces. We’ll play here with the real engine performance parameters:
- Light sampling parameters
- Glossiness sampling and quality parameters
- Global illumination qualitative parameters
We’ll let volumetric effects and caustics outside of the perimeter of the presets we define, because these effects are very specific rarely used. Before we start defining our presets, let’s review the levers we have to balance the quality vs. performance:
RED::OPTIONS_RAY_LIGHTS_SAMPLING_RATE: Define the number of lighting samples that will be used to calculate the real contribution of all scene lights at a given point. The rate - as all ‘rates’ in HOOPS Luminate - is a squared value. If it’s set to 8, the engine will fire 8x8 samples to evaluate the lighting contribution of all lights. Increasing this value has a square function effect, so it can consume time when set high. The effect of the light sampling rate is directly visible on the quality of the generated lighting and shadows:
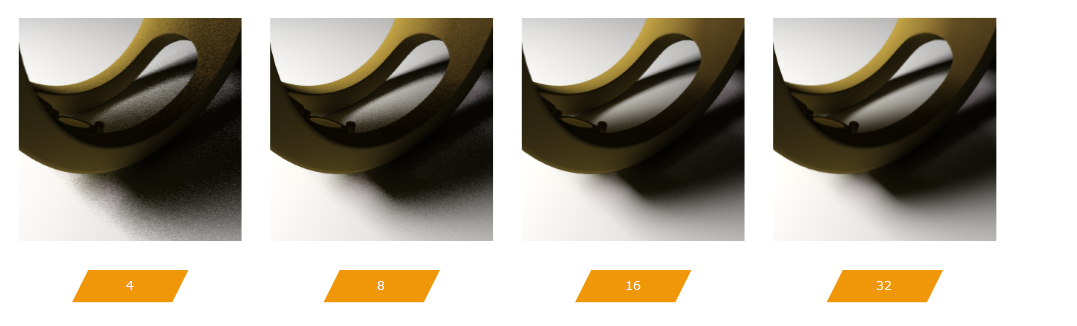
The effect of the light sampling rate option on the resulting image.
Scenes that are using a skylight with no portals will generally require a higher light sampling rate value to render without being too noisy (generally 16+ is acceptable). Indoor scenes with small ligths can use the default value (8); skylights with portals in indoor scenes can also use the default setting (8).
- Similarly, we can control the
RED::OPTIONS_RAY_GLOSSY_SAMPLING_RATEto tune the quality of the reflections in the image. Again it’s a rate, so a squared value. Increasing it has a square function effect, increasing both the quality and the rendering time significantly:
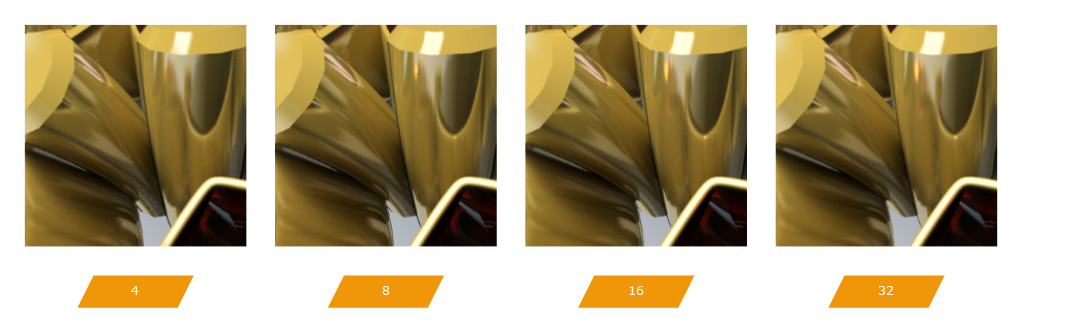
The effect of the glossiness sampling rate option on the resulting image.
For both rates, the default value is 8. It produces medium quality results. Glossy reflections may be extremely expensive to compute. HOOPS Luminate proposes a glossiness approximation option that can be used to speed-up a lot glossiness calculations:
- The
RED::OPTIONS_RAY_GI_FOR_GLOSSINESSis enabled by default, but with a value set to 1 (for a [0,32] range). Increasing this value will let the engine interpolate glossiness based on neighboring information rather than calculating them for each image pixel. Of course, the option requires GI to be enabled to be efficient:
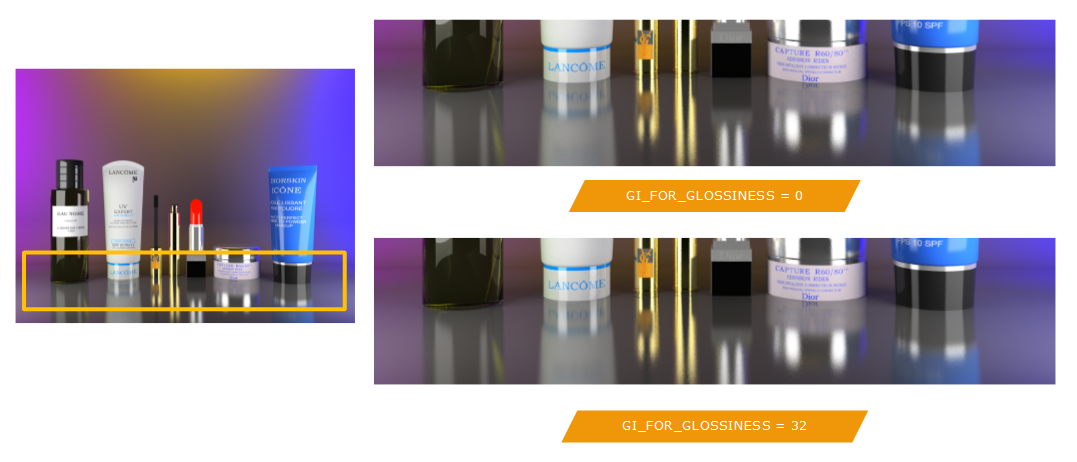
Effect of the glossiness interpolation option, when using the GI cache.
Glossiness loose accuracy when the option value is high, and consequently, the render time may be reduced up to 25% accordingly. The option’s effect is barely visible on really glossy materials for which the reflection is always blurry.
- The
RED::OPTIONS_RAY_GI_FOR_LIGHTINGoption (turned off by default). This option can be used to avoid lighting calculations and use the GI cache instead for them. It requires a quite high quality GI cache to work well. It can show lighting artifacts if the GI cache is not accurate enough.- The
RED::OPTIONS_RAY_GI_CACHE_PRECISEoption controls the accuracy of the global illumination sampling. It has a moderate influence on performance but it can greatly increase the quality of the resulting global illumination signal. To see it’s effects, let’s consider a model with fine details and shadows that are concealed from direct lighting, and therefore that can only be visible with a good and accurate GI solution:
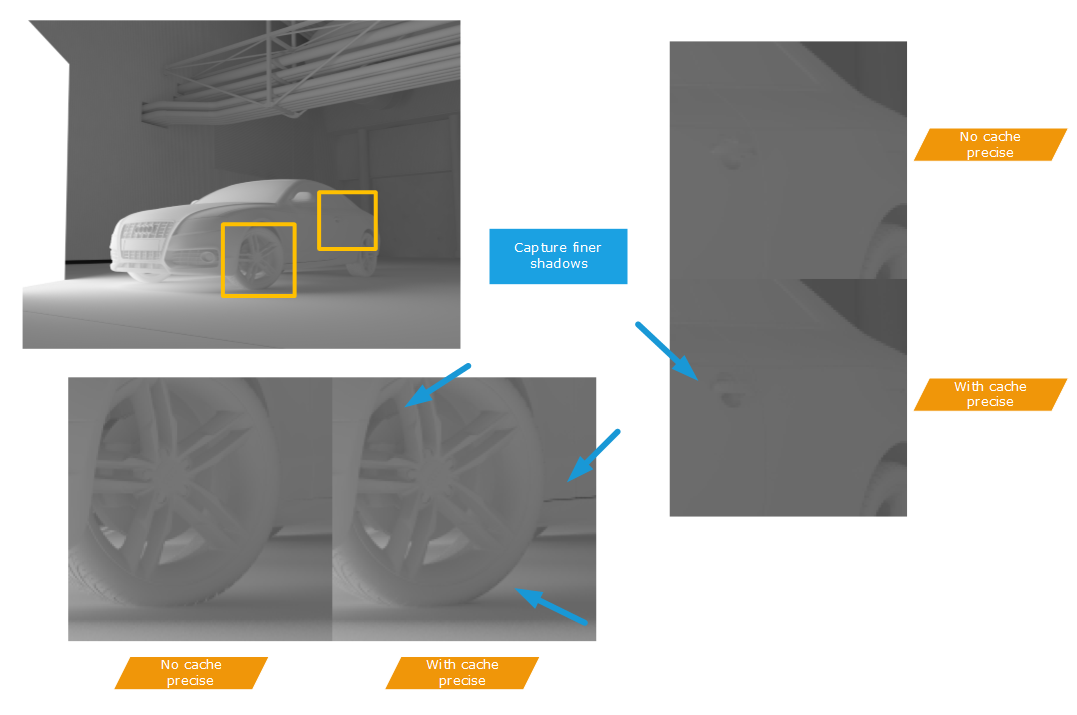
The effect of the RED::OPTIONS_GI_CACHE_PRECISE option seen on the right side of the image
By default, the option is off (false). Enabling it may have a significant impact on performance (10-20%), but it can be helpful for some specific environments in adding that extra quality level that participate to a high realism.
We can also leverage some more GI rendering options to balance between a high quality and a high speed global illumination:
- The
RED::OPTIONS_RAY_GI_ESTIMATOR_SAMPLING_RATEis a parameter that affects the first pass of the GI calculation in HOOPS Luminate. It defines the quality of the indirect lighting in the resulting image, as illustrated below. We show two settings here; a very low value (100) and the default value (1000), to increase differences:
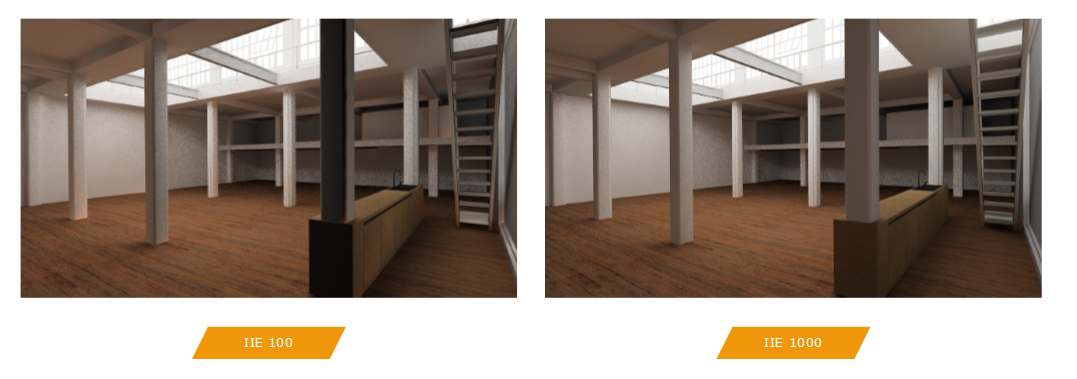
The effect of the estimator sampling rate on the image.
- Finally, the
RED::OPTIONS_RAY_GI_CACHE_PASSES_COUNTcontrol the search for details of HOOPS Luminate’s GI solution. The value indicates a number of refinement passes. More passes allow finer details to be captured. We see the effect below:
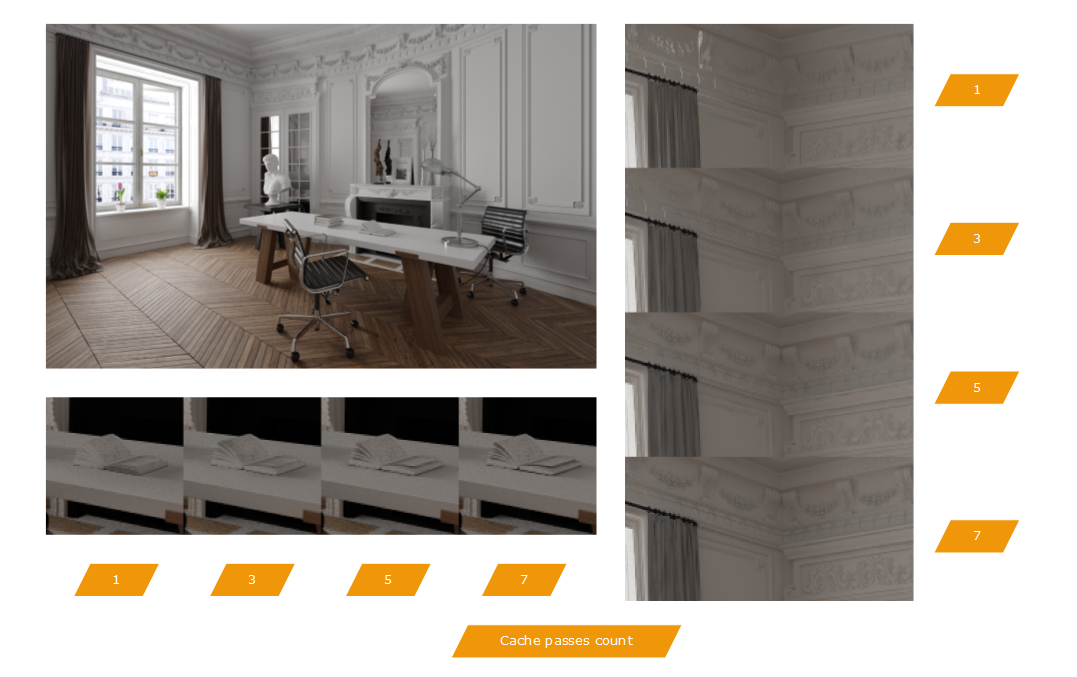
The effect of the number of GI cache passes on the image.
From these key parameters, we can derive our rendering presets:
Rendering Presets
Of course, these are just guidelines you may use at will and adjust to your own application needs, but these three presets should define a good starting basis.
| LOW | |
|---|---|
RED::OPTIONS_RAY_GI_ESTIMATOR_SAMPLING_RATE |
200 |
RED::OPTIONS_RAY_GI_CACHE_PASSES_COUNT |
1 |
RED::OPTIONS_RAY_GI_CACHE_PRECISE |
false |
RED::OPTIONS_RAY_LIGHTS_SAMPLING_RATE |
8 (default) |
RED::OPTIONS_RAY_GLOSSY_SAMPLING_RATE |
4 |
RED::OPTIONS_RAY_GI_FOR_GLOSSINESS |
8.0 |
This ‘low’ quality setting is clearly focused on increasing the rendering speed. We reduce the amount of time spent in the global illumination in reducing the GI estimator quality and in reducing the number of cache passes. Clearly, this will reduce the quality. Then, we also discard all costly glossiness calculations by increasing a lot the glossiness interpolation. Sampling rates are low, so that there we may see noise in the resulting image.
| MEDIUM | |
|---|---|
RED::OPTIONS_RAY_GI_ESTIMATOR_SAMPLING_RATE |
1000 (default) |
RED::OPTIONS_RAY_GI_CACHE_PASSES_COUNT |
3 (default) |
RED::OPTIONS_RAY_GI_CACHE_PRECISE |
false |
RED::OPTIONS_RAY_LIGHTS_SAMPLING_RATE |
16 |
RED::OPTIONS_RAY_GLOSSY_SAMPLING_RATE |
8 (default) |
RED::OPTIONS_RAY_GI_FOR_GLOSSINESS |
2.0 |
This medium setting raises the GI quality to an acceptable level. Most images can be produced using these ‘out of the box’ settings, without having to raise them further. As a choice here, the light sampling rate has been increased. Depending on your own application scenery, if you don’t have many lights, or only small lights, the light sampling rate value can be adjusted significantly. Glossiness are still interpolated, but less than before, therefore increasing their resulting quality.
| HIGH | |
|---|---|
RED::OPTIONS_RAY_GI_CACHE_PASSES_COUNT |
5 |
RED::OPTIONS_RAY_GI_CACHE_PRECISE |
true |
RED::OPTIONS_RAY_LIGHTS_SAMPLING_RATE |
32 |
RED::OPTIONS_RAY_GLOSSY_SAMPLING_RATE |
16 |
RED::OPTIONS_RAY_GI_FOR_GLOSSINESS |
1.0 (default) |
Finally the high quality settings are all about generating a really high level image. The GI quality is strengthened a lot. If your models don’t have many fine details to handle, you can consider keeping medium settings for the GI. These settings are meant to solve visual problems that could occur in very complex indirect lighting situations. So the cache precise option - which comes at a certain cost - can be ignored for many models. Similarly, we have increased a lot the light sampling rate, assuming that we may have many lights to manage. All these settings should be adjusted for each application. Some applications will not require such a high light sampling rate (for instance an automotive outdoor rendering application may require less samples due to the fact that the lighting is always sun / sky based); whereas some other applications (an object design application) may require a higher glossy sampling rate. So the key point here is that these presets should be just used as a starting basis for each application to tune.
As an illustration, here are the three renderings of the main scene used for this book, rendered for each setting. The resolution is 1280x720, rendered on an average computer. Render times are around 2, 6 and 30 minutes for low, medium and high quality images.
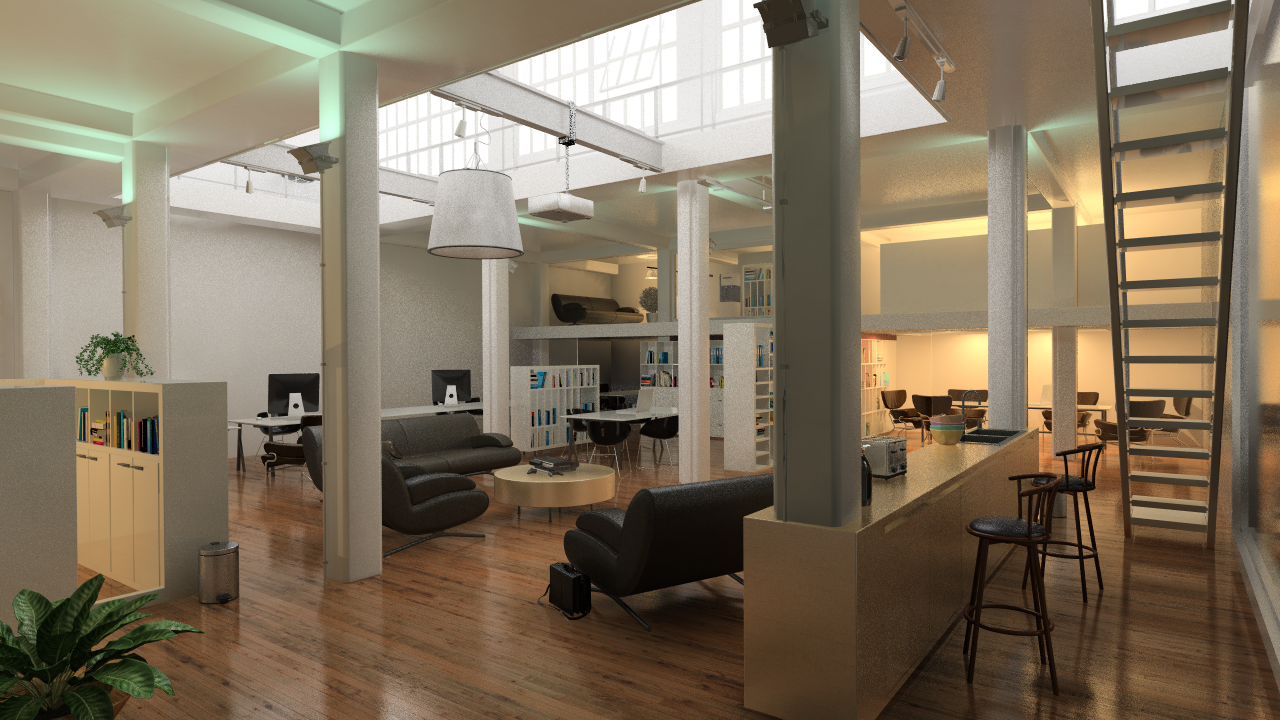
Low quality rendering

Medium quality rendering
High quality rendering
Using Adaptive Sampling
It’s possible to turn on adaptive sampling in HOOPS Luminate to save time with a minimal quality loss compared to a full brute force image. Please refer to this chapter here: Adaptive Sampling for details on how to play with adaptive sampling with HOOPS Luminate.

