Setup Environment Maps
This step defines the real-time reflections of our materials. We do this approximation of realistic reflections using HDR environment maps. The HDR map is loaded on the CPU and then different maps are defined for different glossiness settings of the source material. We define maps for glossiness values 0, 1, 2, 4, 8, 16, 32, 64 and 128:
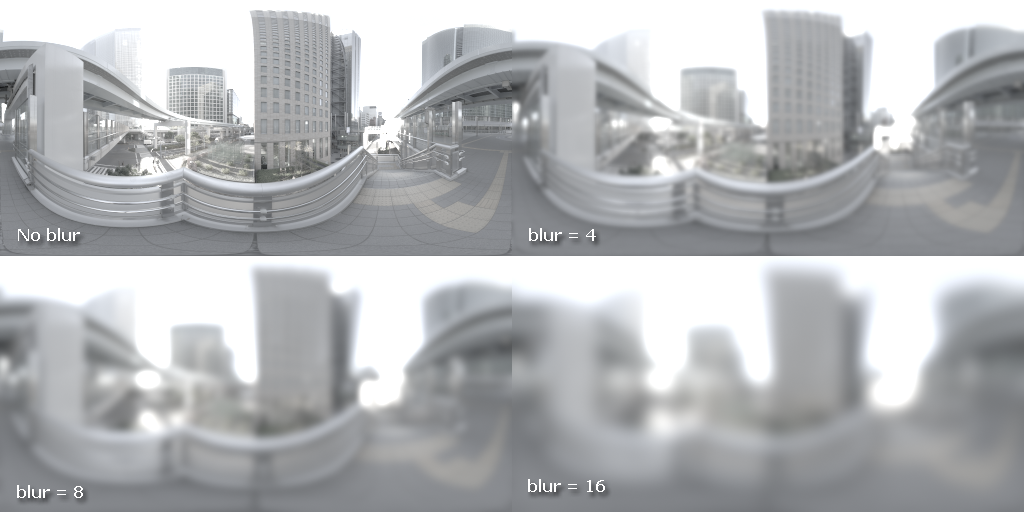
Blurring the source environment map to mimic different glossiness values
This process helps simulating materials that have more or less glossy reflections. The right environment map is chosen during the setup of the material. To remain as fast as possible during this process - which is CPU side in this example - we use a first horizontal blur pass followed by a vertical blur pass. This is possible only because the Gaussian blur is a separable filter.
Using a LDRA Encoding
We use a small trick in the preparation of environment maps here to keep the HDR intensities of our source images while encoding them using LDR image formats. We have to implement such a trick because many low end graphics that are still supported by HOOPS Luminate don’t have the capability to render floating point format cube images natively on the GPU.
For any cube image pixels, we measure the highest component value and store the color value divided by that intensity. Then we store one divided by that value in our alpha channel and reconstruct our final color by dividing the measured RGB by the alpha value. The encoding is shown here:
r = hblur[ 4 * ( y * width + x ) ];
g = hblur[ 4 * ( y * width + x ) + 1 ];
b = hblur[ 4 * ( y * width + x ) + 2 ];

max = REDMax( r, REDMax( g, b ) );

hblur[ 4 * ( y * width + x ) ]     = ( max > 1.0f ) ? r / max : r;
hblur[ 4 * ( y * width + x ) + 1 ] = ( max > 1.0f ) ? g / max : g;
hblur[ 4 * ( y * width + x ) + 2 ] = ( max > 1.0f ) ? b / max : b;
hblur[ 4 * ( y * width + x ) + 3 ] = ( max > 1.0f ) ? 1.0f / max : 1.0f;;
And the decoding in the final shader here:
// Environmental lighting contribution:
str.Temp( "env_color" );
str.Add( "TEX env_color, ref_dir, texture[1], CUBE;\n" );
str.Add( "RCP env_color.w, env_color.w;\n" );
str.Add( "MUL env_color, env_color, env_color.w;\n" );
str.Add( "MUL env_color, env_color, reflection_color;\n" );
The Skymap
We do use a very blurry skymap to source the skylight contribution to our lighting model. We also use the same skymap for the setup of the scene background. This has two advantages: a blurry skymap produces less noise, and a blurry background does not distract the eye from the model to explore, by providing too many details to look after in the back.

