2D Images
Introduction
2D images in HOOPS Luminate (RED::IImage2D) are mostly used to store textures and rendering results. They can be of two major types: power-of-two (POT) or non-power-of-two (NPOT) images. This refers to the image dimensions.
POT images are 2D images with target RED::TGT_TEX_2D while NPOT images are 2D images with target RED::TGT_TEX_RECT. Using those images as texture makes no difference in software rendering mode, but in hardware rendering mode, you can’t address the two types in the same way. The hardware expects texture coordinates in the [0,1]x[0,1] interval when sampling POT textures but, when sampling NPOT textures, the texture coordinates must be in the [0, texture width]x[0, texture height] interval instead. This makes your shader programs look a little bit different depending on the type(s) they support.
When using 2D images as the result of rendering operations, you deal most of the time with RED::TGT_TEX_RECT images as the dimensions are not likely to be power-of-two (however, you can still force the target to be RED::TGT_TEX_2D).
Note
1D images are considered as RED::TGT_TEX_2D images (with height=1). In hardware rendering mode, there is a special target for those images: RED::TGT_TEX_1D. In both software and hardware cases, the HOOPS Luminate interfaces to access to 1D image content is RED::IImage2D.
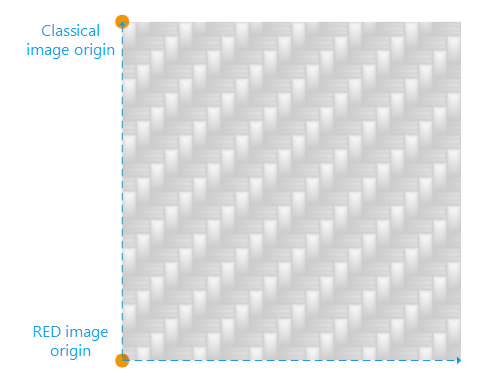
2D Image Origin
HOOPS Luminate inherits of most of the OpenGL conventions, so it does for image origin. While most of the popular image formats expect the origin of images to be in the top left corner, in HOOPS Luminate, the image origin is located in the bottom left corner. Then, when you convert images to or from the RED engine, you need to be careful with the order of your image scan-lines. Hopefully, the image I/O API supports vertical flipping of images (see RED::ImageTools).
HOOPS Luminate inherits of most of the OpenGL conventions, so it does for image origin. While most of the popular image formats expect the origin of images to be in the top left corner, in HOOPS Luminate, the image origin is located in the bottom left corner. Then, when you convert images to or from the RED engine, you need to be careful with the order of your image scan-lines. Hopefully, the image I/O API supports vertical flipping of images (see RED::ImageTools).
Creation of 2D Images
2D images can be either loaded from a file (see ref How to Load and Save Image to File? and How to Load and Save Image to .red File?) or created directly from a pixel array:
Creating a 2D Image
RED::Object* image_2d;

// Create the image.
RC_TEST( iresmgr->CreateImage2D( image_2d, iresmgr->GetState() ) );

RED::IImage2D* i2d = image_2d->As< RED::IImage2D >();

// Let the engine to allocate the image 1024 x 1024 (POTD) pixels array for us.
RC_TEST( i2d->SetLocalPixels( NULL, RED::FMT_RGB, 1024, 1024 ) );

unsigned char* pixels = i2d->GetLocalPixels();
for( int y = 0; y < 1024; ++y )
    for( int x = 0; x < 1024; ++x )
        // Fill in the texture...

// Set the texture content to the renderer.
RC_TEST( i2d->SetPixels( RED::TGT_TEX_2D, iresmgr->GetState() ) );
This code sample creates a 2D image, uses HOOPS Luminate to allocate a local pixel array in the image and uploads the contents of this local pixel array in the engine (therefore on the GPU if HOOPS Luminate uses GPU rendering, and in CPU memory is HOOPS Luminate uses software rendering). The local pixel array remains. It can be deleted if not needed anymore using RED::IImage2D::ClearLocalPixels.
Render Image
HOOPS Luminate render images are results of rendering operations. For each viewpoints render list (VRL), a built-in render image is available through a call to RED::IViewpointRenderList::GetRenderImage which contains the result of the rendering of that VRL. This render image is a direct read-only access to the buffer content.
Additionally, you can create and set your own render images to any VRL by calling RED::IImage2D::SetRenderImage. Those custom render images are more flexible: they can be only a sub-part of the buffer and are copies of the original data making them editable in write mode.
Setting a Render Image
RED::Object* render_image;

// Create the render image.
RC_TEST( iresmgr->CreateImage2D( render_image, iresmgr->GetState() ) );

// Set the render image to the vrl.
RED::IImage2D* irender_image;
irender_image = render_image->As< RED::IImage2D >();
RC_TEST( irender_image->SetRenderImage( vrl, width, height, 0, 0, RED::TGT_TEX_RECT, iresmgr->GetState() ) );
The 2D Image Pixel Formats
Here are the pixel formats supported by 2D images grouped into categories:
- Low Dynamic Range formats (LDR):
RED::FMT_RGB,RED::FMT_RGBA,RED::FMT_L8,RED::FMT_A8- Low Dynamic Range formats with DXT compression:
RED::FMT_RGBA_DXT1,RED::FMT_RGBA_DXT3,RED::FMT_RGBA_DXT5,RED::FMT_RGB_DXT1- High Dynamic Range formats (HDR):
RED::FMT_FLOAT,RED::FMT_FLOAT_RGB,RED::FMT_FLOAT_RGBA,RED::FMT_HALF_FLOAT,RED::FMT_HALF_FLOAT_RGB,RED::FMT_HALF_FLOAT_RGBA- Anti-aliased:
RED::FMT_FLOAT_RGBA_AA
Note
DXT compression applies only to 2D images with RED::TGT_TEX_2D target.
Note
The DXT compressed formats rely on a patent and therefore are available in HOOPS Luminate only if an appropriate hardware is present. For the same reason, software rendering handles DXT compressed textures only if an appropriate hardware is present (the hardware is then used to uncompress the textures).
LDR formats are useful for rendering with a limited range of colour values but as soon as real-life lamps are rendered, the range of captured intensities is far beyond the capabilities of LDR formats. HDR format are then required.
HDR formats can capture the full range and precision of the computations and are the formats of choice for high quality rendering. HDR formats can be converted to LDR ones; this process is called tone mapping and is covered in Tone Mapping.
Anti-Aliased Images: The RED::FMT_FLOAT_RGBA_AA format
Finally, a proprietary format has been introduced in HOOPS Luminate: RED::FMT_FLOAT_RGBA_AA. It’s a HDR format and can store images rendered under complex lighting conditions. But it also has additional useful features:
- Anti-aliasing preservation: the format encodes anti-aliasing information; the user can then modify the image content (curves modification, brightness / contrast edition…) without breaking the anti-aliasing of the signal, even after the image has been completed
- Background isolation: the background of the scene is separated from the rest and can be later modified (on-site integration of architectural projects for example)
- Compact: even if a lot of information are encoded in it, the format is quite compact (128 bits/pixel)
HOOPS Luminate offers a few handy tools to manipulate the RED::FMT_FLOAT_RGBA_AA format:
RED::Color::DecodeRGBAAAandRED::Color::EncodeRGBAAAcan be used to convert aRED::FMT_FLOAT_RGBApixel color into aRED::FMT_FLOAT_RGBA_AApixel color and vice-versa. This operation will not preserve anti-aliasing on modified pixels. No tonemapping is applied during the decoding of a color.RED::Color::GetRGBAAABackgroundandRED::Color::SetRGBAAABackgroundcan be used to extract and replace the background color in an anti-aliased image. This operation will preserve anti-aliasing on modified pixels.
Finally a complete tone mapping can be applied to pixels in a RED::FMT_FLOAT_RGBA_AA image, using RED::PostProcess::ProcessAA. This method can be used to decode AND to tonemap a pixel in an anti-aliased image.

