Shadow Mapping Detailed
Shadow mapping is the fastest shadowing technique that can be used on a modern GPU. The principle is about rendering the scene from the light point of view and to generate a depth map out of this rendering, as illustrated below:
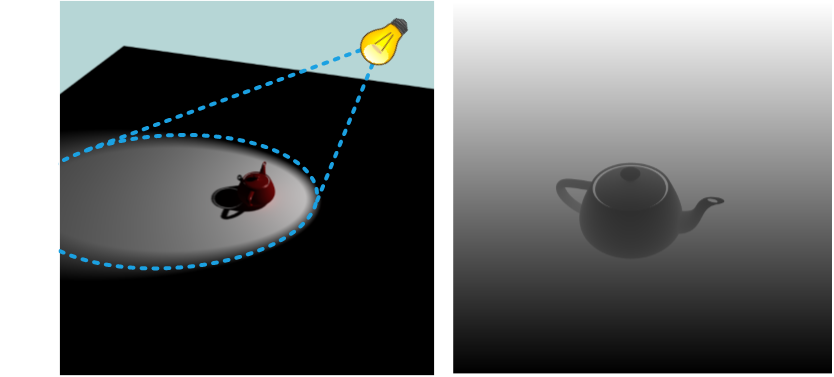
The view from the camera on the left and the view from the light on the right
A first rendering pass processes the scene from the light’s point of view. It generates a depth map (as illustrated on the right, above). This depth map is then used in a second rendering pass (from the camera point of view). Each visualized position is checked against the depth map generated in the first pass. If the distance to the light is below the depth value stored in the depth map, the point is illuminated, otherwise it’s in shadow:
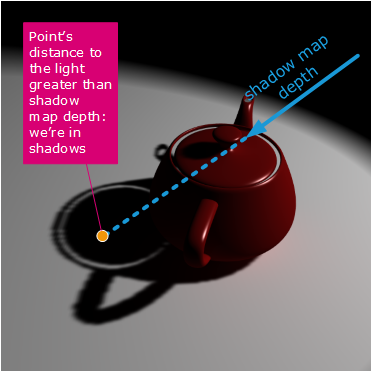
An illustration of the shadow map usage during the second rendering pass
First of all, let’s turn on shadow maps:
Enable Shadow Mapping
First, a light that supports shadow mapping is needed for this to be efficient:
- A spot light (Setup a Spot Light)
- A beam light (Setup a Beam Light)
- Point lights also support shadow mapping, but this is a 6 pass process, that is taking more time (Setup a Point Light)
Then:
RED::ILightShape* ilight = light->As< RED::ILightShape >();
RC_TEST( ilight->SetShadowMapping( true, iresmgr->GetState() ) );
All the methods needed to configure a shadow map are detailed in the doc Real-Time Lights under the section Configuring Shadow Mapping.
Shadow Map Algorithm Limits
Shadow mapping is a limited technique. It’s very practical, convenient to use, fast; but it has also several strong limits that one must be aware of before choosing to use that technique instead of others available:
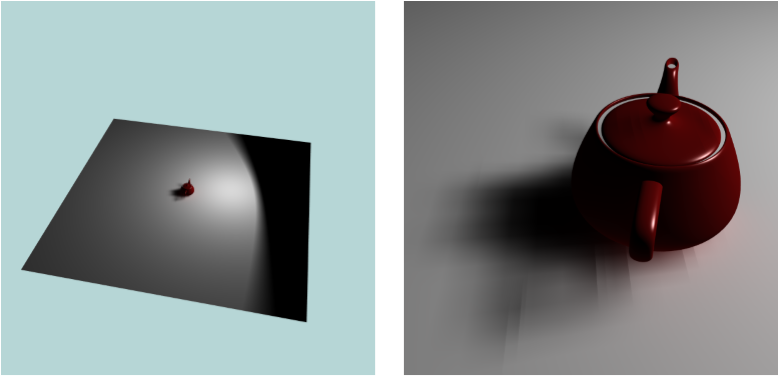
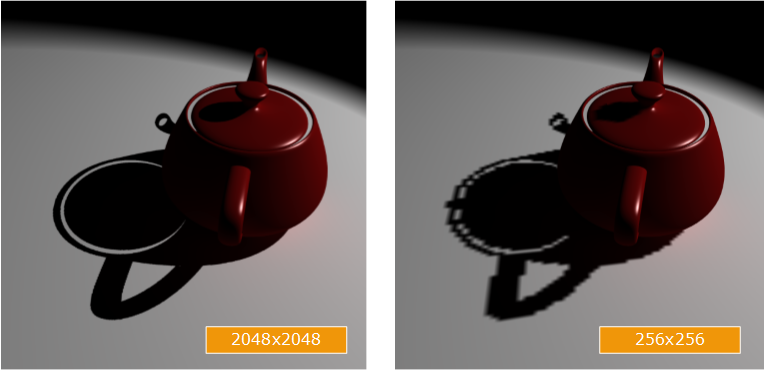
- Shadow mapping has a limited coverage: shadow maps have a resolution (this is the size of the shadow map image that is created during the first pass); Consequently, a shadow map has a limited model surface coverage. If the shadow map covers a too large region of the scene, then the quality of the shadow doesn’t look good anymore unless we dramatically increase the resolution of the shadow map:
- Shadow mapping suffers from biasing: if the resolution of the shadow map is not accurate enough; if the shadow map depth near / far range (the first pass is a rendering from the light viewpoint, so it has near / far clip distances) is not set well enough, then the shadow map will suffer from biasing issues:
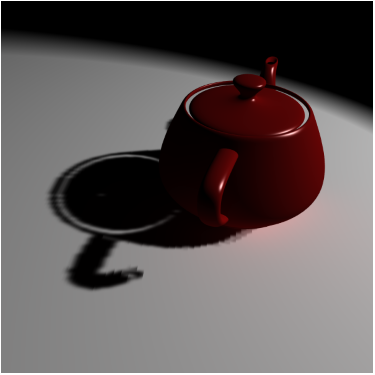
- Shadow map image texels can be visible if the shadow map is not blurry enough or if its resolution is not set high enough:
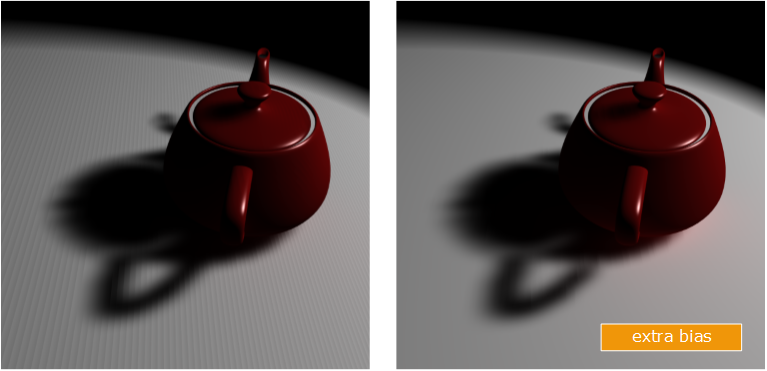
- Shadow map can get smoothed texels (using a blurriness algorithm), but in this case, we see artifacts appearing that require extra biasing to be countered:
Using Shadow Map Auto Range
Images above illustrate the fact that shadow mapping is a very good technique, but that require a bit of tweaking to work well! HOOPS Luminate’s API aim at making the setup of shadow map simpler. Therefore, HOOPS Luminate owns a shadow map auto-range determination algorithm that automatically calculate the best near / far ranges to use for the rendering of the shadow map. This algorithm is not perfect, but it works well with 99.99% of all models.
Basically, HOOPS Luminate does a first rendering of the shadow map. Then it analyzes the results and decides on rendering the shadow map another time, using more precise near / far range values for the shadow map, so that its accuracy can be increased.
Using shadow map auto-range adds one rendering pass for the light. For that price, the user generally does not need to setup explicit near / far values for its light. Shadow map auto range is controlled by RED::ILightShape::SetShadowMapAutoRange / RED::ILightShape::SetShadowMapCustomRange.
Filtering and Blurring Shadow Maps
Shadow map filtering is controlled using RED::ILightShape::SetShadowMapFiltering. Shadow map blurriness is set by RED::ILightShape::SetShadowMapBlur. Adding blur to a shadow map may have a significant cost on performances.
Adding blur to a shadow map will cause biasing artifacts to be revealed, as we have illustrated above. Countering this effect is done by setting up an extra shadow bias using RED::ILightShape::SetShadowMapPolygonOffset.
A rule of thumb here is to set a polygon offset factor roughly equal to the blurriness value.
Shadow Map Direct Access
In HOOPS Luminate, a shadow map is generated first using a rendering pass from the light’s viewpoint. Then, a second rendering pass occurs from the scene camera viewpoint, that is used to generate a shadow map image. Then this shadow map image is used in all the shaders involved for the rendering of the scene.
It’s possible to avoid this second pass generating the shadow map image and to use the shadow map directly ‘as is’ from a shader. See the RED::ILightShape::SetShadowMapDirectAccess method for details.

