The Shading Pipeline
The shading pipeline is the list of rendering passes performed at the camera level to produce an image. Graphical data are attached to the camera itself. Therefore, we ‘render’ the contents of a camera, and the produced result is positioned in the window that is hosting the camera. The viewpoint render list to which the camera has been attached defines the viewport information of the camera in the window.
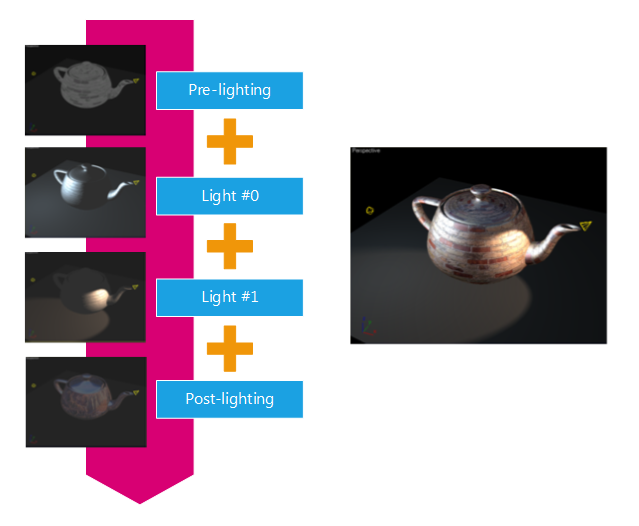
The way geometries (meshes, lines, texts, etc…) are rendered on screen is defined by the contents of the material applied to the shapes. Each material can use a number of rendering passes, as shown by the schema below:

The additive default rendering pipeline
The principle used by the engine to generate an image is to cumulate the results of all rendering passes that have been defined on the material of the rendered geometry. Each pass results are blended with what has been already calculated by earlier rendering passes. In the example above, we have a bit of ambient colour, which is rendered as a first pass. Then, we add the contribution of each light source and finally we add a reflecting environment contribution. This one is a possible example of shading pipeline assembly. The container of all these rendering passes is the RED::IMaterial.
The Rendering Passes
The default pipeline uses three different rendering passes (see RED::MATERIAL_PASS):
- The
RED::MTL_PRELIT pass: This is the pre-lighting pass, which is executed first for the evaluation of a material’s resulting colour- Then, the
RED::MTL_LIT passes: The contents of this pass is executed one time for each light found in the scene. Therefore, this makes the model flexible to any kind of lighting configuration, as you can add and remove lights without changing anything to the material itself- Finally, the
RED::MTL_POSTLIT pass: This pass is executed last. A common usage for it is to add reflectivity information to the lighting
There are more rendering passes that are worth mentioning here. We define indirect passes:
RED::MTL_INDIRECT_PRELIT: This is a rendering pass exactly equivalent to theRED::MTL_PRELIT, that is requested for the support of GPU accelerated ray-tracingRED::MTL_INDIRECT_LIT: The indirect pass that corresponds toRED::MTL_LITRED::MTL_INDIRECT_POSTLIT: The indirect pass that corresponds toRED::MTL_POSTLIT
The point of these indirect passes is to store special GPU shaders that are needed for the rendering of geometries that are visible through reflections or refractions.
We also have a special pass called the RED::MTL_RAYTRACE. This pass is a rendering pass that contains shaders that may be needed by the engine to perform various calculation tasks on geometries - on purpose. For example, this pass may contain a RED::RayGIDiffuseShader that can tell to the engine the amount of diffuse colour to consider for the material during a global illumination calculation phase. Or, this pass could contain a RED::RayCutoffShader, which is a performance shader that’ll be executed to minimize the amount of ray-traced calculations.
State Shaders and Rendering Shaders
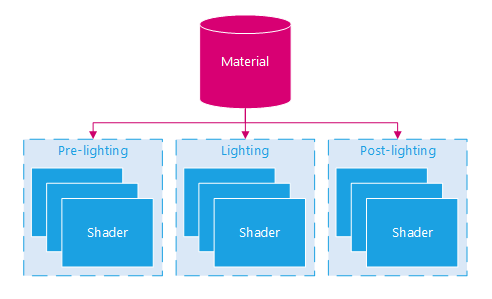
A material contains several shaders organized in rendering passes. A shader is a more or less simple program that gives to the programmer the control over the way pixels will appear on screen. Each one of these shaders is executed by HOOPS Luminate in a given order inside a material.

A material contains shaders organized in rendering passes
HOOPS Luminate have a very flexible shader pipeline letting the user writing his own shaders, either in ARB assembly or in OpenGL Shading Language (GLSL) for GPU rendering and arranging them in any order inside the rendering passes. Writing your own shaders for software rendering is also an option of the API. Finally, for those who do not want or have time to dig into the world of shader programming, HOOPS Luminate provides numerous built-in ones for any use.
Example of a simple GLSL shader program:
void main( void )
{
  gl_FragColor = vec4( 1.0, 0.0, 0.0, 1.0 );
}
The same program in assembly:
!!ARBfp1.0
MOV result.color, { 1.0, 0.0, 0.0, 1.0 };
END;
In software rendering, another kind of routine:
RED_RC AmbientShader( double                            ocolor[4],
                      const RED::ISoftRayContext&       rayctx,
                      const RED::ISoftShaderContext&    shaderctx,
                      const RED::ISoftRenderingContext& renderctx,
                      const RED::Version&               version )
{
  ocolor[0] = 1.0;
  ocolor[1] = 0.0;
  ocolor[2] = 0.0;
  ocolor[3] = 1.0;

  return RED_OK;
}
As you probably already guessed, each of these shader programs writes a constant red colour.
The RED::RenderShader
In HOOPS Luminate the shader program mechanism is handled by the RED::RenderShader class. Shaders are added to the material with the RED::IMaterial::AddShaderToPass function. By using this method, users have to specify in which RED::MATERIAL_PASS and at which position he wants to add the shader. The RED::IMaterial::RegisterShader must also be called to register the shader in the material.
The RED::RenderShader is an atomic class. It holds the shader programs and provides functions to define the geometrical inputs and the parameters. It is the base class of all the built-in and user-custom render shaders.
A complete list of all the built-in shaders is available on the page: Using Built-in Render Shaders.
The RED::StateShader
Unlike rendering shaders that produce a colour, RED::StateShader objects are just here to mix the various results of the rendering shaders. They handled:
- The blending mode -
RED::StateShader::SetBlendingMode- The depth operations -
RED::StateShader::SetDepthFunction,RED::StateShader::SetDepthTest- The face culling -
RED::StateShader::SetFaceCulling- The transparency -
RED::StateShader::SetSortedTransparency,RED::StateShader::SetNoTransparency- The displacement -
RED::StateShader::SetDisplacement- etc.
A state shader configures all the following render shaders in the pipeline until another state shader is met.
A full list of the state shader features is available here: Configuring a Render Shader Using a State Shader.
Registering and Adding a Shader to a Material Pass
// Let:
// - iresmgr be the RED::IResourceManager;
// - imat be a RED::IMaterial.

// Create an ambient shader:
RED::RenderShaderAmbient ambient( RED::MTL_PRELIT,
                                RED::Color::WHITE, NULL, RED::Matrix::IDENTITY, RED::MCL_TEX0,
                                RED::Color::BLACK, NULL, RED::Matrix::IDENTITY, RED::MCL_TEX0,
                                RED::Color::BLACK, NULL, RED::Matrix::IDENTITY, RED::MCL_TEX0,
                                RED::Color::WHITE, NULL, RED::Matrix::IDENTITY, RED::MCL_TEX0,
                                true, resmgr, rc );
RC_TEST( rc );

// Register the shader to the material:
RC_TEST( imat->RegisterShader( ambient, iresmgr->GetState() ) );

// Add the shader at the end of the pre-lit rendering pass:
RC_TEST( imat->AddShaderToPass( ambient.GetID(),
                                RED::MTL_PRELIT,
                                RED::LIST_LAST,
                                RED::LayerSet::ALL_LAYERS,
                                iresmgr->GetState() ) );
In this sample code, a simple built-in ambient shader is created. It is then registered to a material and added at the end (RED::LIST_LAST) of the prelit material pass (RED::MTL_PRELIT).
Mimicking a Direct Shader Setup for Indirect Rendering Passes
Contrary to software rendering, the transparencies and reflections are not automatic in GPU mode. If you want to create such a custom material, in addition to the shaders in the direct material passes:
RED::MTL_PRELITRED::MTL_LITRED::MTL_POSTLIT
you also have to create shaders for indirect material passes:
RED::MTL_INDIRECT_PRELITRED::MTL_INDIRECT_LITRED::MTL_INDIRECT_POSTLIT
These shaders will be called for all the calculations that are done after a first level of ray reflection or refraction.
In the next example, an ambient shader is built for direct prelit material pass and for indirect prelit material pass with the same setup:
// Ambient shader:
RED::RenderShaderAmbient ambient( RED::MTL_PRELIT,
                                RED::Color::WHITE, NULL, RED::Matrix::IDENTITY, RED::MCL_TEX0,
                                RED::Color::BLACK, NULL, RED::Matrix::IDENTITY, RED::MCL_TEX0,
                                RED::Color::BLACK, NULL, RED::Matrix::IDENTITY, RED::MCL_TEX0,
                                RED::Color::WHITE, NULL, RED::Matrix::IDENTITY, RED::MCL_TEX0,
                                true, resmgr, rc );
RC_TEST( rc );

RC_TEST( imat->RegisterShader( ambient, iresmgr->GetState() ) );
RC_TEST( imat->AddShaderToPass( ambient.GetID(), RED::MTL_PRELIT, RED::LIST_LAST, RED::LayerSet::ALL_LAYERS, iresmgr->GetState() ) );

// Ambient indirect shader:
RED::RenderShaderAmbient ambientI( RED::MTL_INDIRECT_PRELIT,
                                RED::Color::WHITE, NULL, RED::Matrix::IDENTITY, RED::MCL_TEX0,
                                RED::Color::BLACK, NULL, RED::Matrix::IDENTITY, RED::MCL_TEX0,
                                RED::Color::BLACK, NULL, RED::Matrix::IDENTITY, RED::MCL_TEX0,
                                RED::Color::WHITE, NULL, RED::Matrix::IDENTITY, RED::MCL_TEX0,
                                true, resmgr, rc );
RC_TEST( rc );

RC_TEST( imat->RegisterShader( ambientI, iresmgr->GetState() ) );
RC_TEST( imat->AddShaderToPass( ambientI.GetID(), RED::MTL_INDIRECT_PRELIT, RED::LIST_LAST, RED::LayerSet::ALL_LAYERS, iresmgr->GetState() ) );
Capturing Intermediate Results Images
Each material pass fills two buffers:
- the backbuffer / color buffer
- the depth buffer
The buffers content can be retrieved between each of the direct material pass and available as texture images for the next pipeline stages.
Render shaders in the RED::MTL_LIT material pass can access to the images resulting of the RED::MTL_PRELIT pass.
Render shaders in the RED::MTL_POSTLIT material passes can access to the images resulting of the RED::MTL_LIT passes.
Shader parameters can be created to transmit these texture images using the following references:
RED::RenderShaderParameter::REF_BACK_COLOR_IMAGEfor the backbufferRED::RenderShaderParameter::REF_BACK_DEPTH_IMAGEfor the depth buffer
To have details about shader parameters, refer to the following page: Writing Custom Render Shaders.
Checking the Availability of Needed Input Geometry Channels
A material method allows to query about the mesh channels it uses: RED::IMaterial::GetUsedChannels.
This function returns a list of RED::MESH_CHANNEL needed by the material shaders. The list data are grouped by RED::LayerSet.
typedef RED::Vector< RED::MESH_CHANNEL > ChannelVector;
RED::Map< RED::LayerSet, ChannelVector > channels;

// Retrieve the mesh channel list from the material:
RC_TEST( imat->GetUsedChannels( channels ) );

// Get the channels for the 'all layer' layerset:
ChannelVector* chan = channels.find( RED::LayerSet::ALL_LAYERS );

bool usetex0 = false;
if( chan != NULL )
{
    // Loop through the needed mesh channels and search for the RED::MCL_TEX0 channel:
    for( int i = 0; i < chan->size(); ++i )
    {
        usetex0 = usetex0 || ( (*chan)[i] == RED::MCL_TEX0 );
    }
}

if( usetex0 )
{
    // Be sure this channel is filled in your geometry...
}
In this sample, the channel list was retrieved from the material. Then we looped through it to find if the material needs the RED::MCL_TEX0 channel.

