Culling Methods
HOOPS Luminate has several built-in or customizable culling systems available that can be used to taylor the rendering of an application. We find:
- Bounding sphere culling: This is the simplest and most common culling technique available.
- Context switch culling: This is a callback based culling system that interferes early with the rendering pipeline.
- Visibility switch culling: This is another callback based culling, dedicated to visible geometry culling.
The example below will detail the influence of each mechanism on the rendering:

Frustum Culling
With no culling solution, to display this scene with one camera and one spot light illuminating objects in its blue cone, assuming we have simple pre-lighting and lighting stage shaders, we’ll need to render: A, B and C in pre-lighting pass, followed by A, B and C in lighting pass.
If we have set bounding spheres over the geometry that can be used by HOOPS Luminate to spatialize geometries (see Update Bounding Spheres for a Hierarchy of Shapes), then we’ll render: A and C for the pre-lighting pass (B is not inside our viewing frustum, so its discarded); followed by A only in the lighting pass (B is not inside our frustum, and C is not reached by the light).
So, this is a first level culling system that can be enabled by any application, using built-in tools provided by HOOPS Luminate. It’s easy to setup as it requires only a few calls. However, it needs maintenance each time the scene graph is modified; and it may have a cost if there are many bounding spheres that each enclose only small meshes. But besides that, generally speaking, it can save time when used, and that’s all what wants a real-time application: save time!
Frustum Culling and Shadows
We have seen that adding bounding spheres saved the rendering of B in pre-lighting plus B and C in lighting pass. If we have shadows (for instance let’s imagine that our spot light has a shadow mapping setup on it), then we’ll need an extra pass to render this shadow map. In this configuration, we’ll need to process:
- Pre-lighting: A + C
- Shadow map: A + B
- Lighting: C
This because A can cast shadows over other objects in the scene, so it can’t be discarded from the shadow map processing. In this case, HOOPS Luminate will do the necessary culling and render all necessary objects for each rendering pass that has to be done by the engine.
Using Culling Callbacks
HOOPS Luminate culling callbacks are methods that can be called on a per-shape basis. Each shape can use one or both callbacks by specifying them with:
RED::IShape::SetContextSwitchCallbackorRED::IShape::SetVisibilitySwitchCallback
A culling callback can be used to prevent objects from being displayed by the engine. The term context / visibility refers to the perimeter of the HOOPS Luminate rendering passes handled by the callback.
A context switch callback filters objects from all engine rendering passes. This means that any object filtered by the context switch callback will not be displayed. Period. These objects by default are also discarded from all the engine ray-tracer acceleration structures unless the RED::OPTIONS_RAY_CONTEXT_CALLBACK_PERSISTENCE is turned on.
A typical usage of the context callback is to discard entire sections in a large model. For instance let’s imagine an application displaying an entire building. If we know that we’re on the 5th floor, then we can surely discard all other floors from the display. No need to keep them and pay any render time for elements that we know won’t be visible.
If we go back to our previous example, using a context switch callback to discard object B will generate the following rendering passes:
- Pre-lighting: A + C
- Shadow map: A
- Lighting: C
A visibility switch callback is different. The visibility switch callback only removes objects that are directly seen by the camera. Therefore, in our previous example, removing object B using a visibility switch callback would NOT change anything:
- Pre-lighting: A + C
- Shadow map: A + B
- Lighting: C
B is not directly visible, so it’s neither visible in pre-lighting pass nor in lighting pass. However, it’s drawn for shadowing during the shadow map pass; As this pass is not a direct visibility pass, object B is not discarded.
One common usage of the visibility switch callback is about removing walls or roofs that prevent us to see the interior of a model, while keeping all the rendering intact. See the image below, which is a flat seen from above:
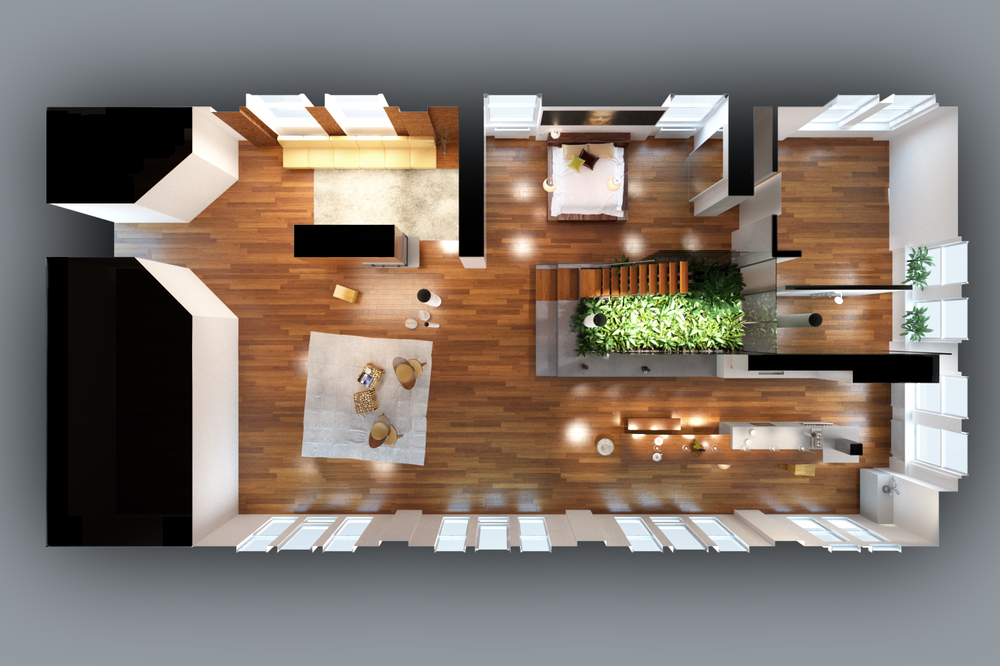
The roof of the flat has been removed from the primary visibility, but remains present in all other rendering passes
In all ray-tracer passes that are non direct (reflections, refractions, GI, shadows) the roof of the flat is kept in the calculations; However, for the purpose of seeing it directly, it’s removed.
The tutorial here: Using Culling Callbacks for Visibility Control provides a simple example of visibility filtering done through culling callbacks.
Using Levels of Detail (LODs)
HOOPS Luminate does not offer built-in mesh decimation tools. However, HOOPS Luminate culling callbacks are very handy to use for the implementation of a LOD selection criterion. A simple context callback can be used to choose a level of detail for a given mesh for all the rendering passes that’ll be needed by HOOPS Luminate.

