Real-Time Rendering of 3D Datasets
Real-time rendering of 3D data is one of the main task you’ll certainly wish to achieve using HOOPS Luminate. HOOPS Luminate can deliver very good performances on very large assemblies. However, a few guidelines should be observed in order to reach an optimal display solution for your need.
Real-Time or Real-Time?
A first important thing that we must be aware of: what kind of real-time display are we referring to? A ‘real-time’ application can be one of these:
- A viewport display in a CAD or design application
- A video game display
- A simulation engine display
Each application can call itself as performing ‘real-time’ display. However, the FPS - the number of frames displayed per second - can greatly vary. A typical CAD or design application viewport can display data from 5 FPS to 30 FPS. A video game will typically try to keep a 30+ FPS on screen while a simulation engine can’t display anything below 60 FPS.
So the type of real-time application is important. The application rendering performance needs and flexibility can drive the choice for one or another way of using HOOPS Luminate. Let’s review two major categories of applications:
| Application Type | Threading Architecture | Shading Model |
|---|---|---|
| CAD / Design | Single-Threaded Graphic Applications | Using Built-in HOOPS Luminate Materials |
| Game / Simulation | Multi-Threaded Performance Critical Applications | Writing a Custom Material |
A typical CAD / Design application needs flexibility: the set of lights is dynamically chosen by the user. Unlike in a video game or simulation environment, data are not constrained: models can be of any size, and the visualization of one model may completely differ from another one in size, number of lights and materials. That’s why the resulting performance can vary a lot. Among all flexibility needs, we have a great need for a customizable lighting pipeline. Therefore, using HOOPS Luminate built-in materials and shaders is a great time saver, as these are dynamically adapting to the lighting environment.
On the other hand, a performance critical application like a simulation engine requires a single-pass custom shading system: the application may not be capable of paying the price of extra rendering passes for each light to consider. In this case, using materials with application specific shaders may be the best solution to ensure that the number of rendering passes remain as low as possible for the application needs.
This leads us to considering the number of rendering passes involved in the computation of a frame:
Accumulating Rendering Passes
The number of rendering passes can be approximatively determined. Basically, we’ll count each time we have a viewpoint to draw in a VRL, and for each viewpoint, we’ll count the number of passes initiated by the data being rendered:
- Count 1 for a shader in the
RED::MTL_PRELITpass of materials.- Count 1 for each light present in the scene for a shader in the
RED::MTL_LITpass of materials.- Count 1 for a shadow map generation (count 2 if shadow map auto range is enabled).
- Count 1 for a shader the
RED::MTL_POSTLITpass of materials.- Count ‘n’ for the rendering of transparent objects, where ‘n’ is the
RED::OPTIONS_RAY_TRANSPARENCYvalue.- Multiply material passes count by 2 for a double sided material rendering.
This is for one RED::RenderShader in pre-lighting, one in lighting and one in post-lighting. If a material uses two RED::RenderShader instances in a material rendering pass count 2 for that pass instead of 1. Then, the price of a single rendering pass need to be modulated by the efficiency of culling techniques involved for that pass (frustum culling, light culling, custom callbacks culling, …)
In addition to this we need to count the pipeline implicit passes, that are mostly screen sized texture copy or shading operations.
- Count 1 for each render image that needs to be generated (see
RED::IImage2D::SetRenderImage)- Count 0 for a built-in VRL render image accessed directly (see
RED::IViewpointRenderList::GetRenderImage)
Then,
- Count 1 rendering pass plus 1 texture copy for each rendering pass for each
RED::IImageCompositeimage used by a shader. A composite image is a screen sized generated texture image, so its contents are defined by a rendering pass.- Count 6 for each automatic cube map that has to be generated!
And finally, take anti-aliasing into consideration:
- Hardware anti-aliasing does not generate extra rendering passes (at least not at the application level)
- Engine anti-aliasing at level ‘n’ multiplies everything by n*n (one complete draw for each image tile) if super-scaling is turned off
- Engine anti-aliasing at level ‘n’ just adds a screen sized downsize pass if super-scaling is turned on
And last, GPU tone-mapping:
- Adds one screen sized pass
So as a total, the application will render a number of passes drawing geometries and the engine may need to copy (or to apply shaders) a pass results into textures that can be accessed later on during the rendering of the same frame. Depending on the rendered window size, and of course on the application data, screen copy / shading time may be significant or not compared to the real rendering. On non performance critical applications for applications with simple pipelines, this time is generally low enough to be ignored.
Then, the scope of a rendering pass may be determinant in the cost of that pass: for instance the cost of rendering transparent objects may be small if there are almost no transparent objects to handle compared to opaque ones.
Choosing between Dynamic Lights and Baked Lights
As we have seen, the number of rendering passes involved in the processing of a single frame can be quite high. A large set of light sources can slow down the system a lot, due to the extra rendering passes caused by these lights. It’s possible to bake lights. A baked light is not rendered at all during the processing of the frame. It’s contribution is stored as a pre-processing phase while computing a global illumination cache.
Please refer to the GI and Light Baking tutorial for details on light baking.
Choosing a Full HDR Rendering Pipeline
From the GPU Functional Level matrix, we can see that all of today’s GPU have a built-in support for a full HDR rendering pipeline. Therefore, and due to the fact that HOOPS Luminate delivers all the tools needed to render physically correct scenes, turning on HDR is a must have to any application that aim at getting a strong grip on image quality.
Setting Up a HDR Rendering Pipeline
A full High-Dynamic-Range (HDR) rendering pipeline is using unclamped floating point data at all stages of the rendering. Then, the results of the rendering is scaled down to fit into the [ 0, 1 ] range of values that is used to submit data to the final Low-Dynamic-Range (LDR) output screen display:
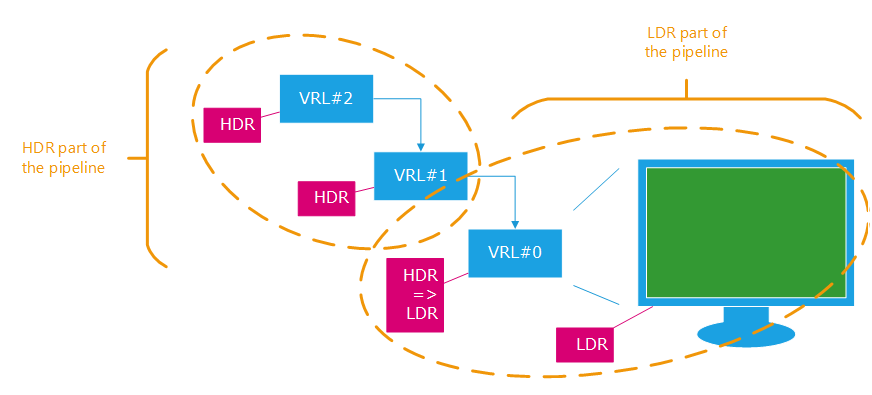
A typical HDR pipeline in an application
In the example above, all the contents of the VRL#2 and VRL#1 are rendered using floating point buffers. Then, all results of the VRL#1 are rendered into VRL#0 that can be HDR or LDR, but that will always include a implicit HDR to LDR rendering pass before we can send the results to the display whose capabilities are only 8 bits per color components (or 10 bits for 30 bits screens).
The HDR to LDR phase is either performed using Tone Mapping or, if no tonemapping is enabled, by a clamp of all color values to the [ 0, 1 ] LDR range.
HDR can be turned on by two methods in HOOPS Luminate:
- Create HDR VRLs directly using a floating point format:
RED::Object* vrl;
int width = 1920;
int height = 1080;
RC_TEST( iwindow->CreateVRL( vrl, width, height, RED::FMT_FLOAT_RGBA, true, iresmgr->GetState() ) );
Turn on HDR globally at the window level using the RED::OPTIONS_WINDOW_HDR:
RED::IOptions* iwinopt = window->As< RED::IOptions >();
RC_TEST( iwinopt->SetOptionValue( RED::OPTIONS_WINDOW_HDR, 2, iresmgr->GetState() ) );
Note that a VRL in a window can override the option value using RED::IViewpointRenderList::SetHDROverride, if it has to be LDR or HDR in a window that has a global option value that differs.
Shadow Mapping
The current technology that deliver the best performance for shadowing is shadow mapping. HOOPS Luminate supports a variety of other shadowing techniques, but for a true real-time (30+ FPS) appplication, shadow maps remain the best choice to get dynamic shadows at a small rendering cost.
We’ll review all shadow mapping details here: Shadow Mapping Detailed.
Advanced Real-Time Shadows
Maybe the world ‘real-time’ is a bit exaggerated here ;-) HOOPS Luminate’s real-time engine and hardware accelerated ray-tracing engine can generate two other types of shadows that can be enabled in a real-time environment:
- Hard ray-traced shadows that result of the activation of the
RED::OPTIONS_RAY_SHADOWSoption, used in aRED::IWindow::FrameDrawingcall.- Soft ray-traced shadows that result of using shadow casting with a rectangular area light or with a skylight.
See all the details here: Advanced Shadows in Real-Time

