Using Physical Lights
HOOPS Luminate is both a real-time and a photo-realistic rendering engine. Therefore, the lighting part of the API contains a lot of different lights, for different needs. Real-time graphics have used centric lights for years due to the fact that the lighting cast by these lights was easy to calculate on graphics hardware. Now, in the real world, these lights don’t exist at all. All real lights have an emitting geometry. It can be a lamp bulb filament, a neon filled with gas a sun disk or any other shape. But in all circumstances it’s not a single point in space.
Centric Lights vs. Physical Lights
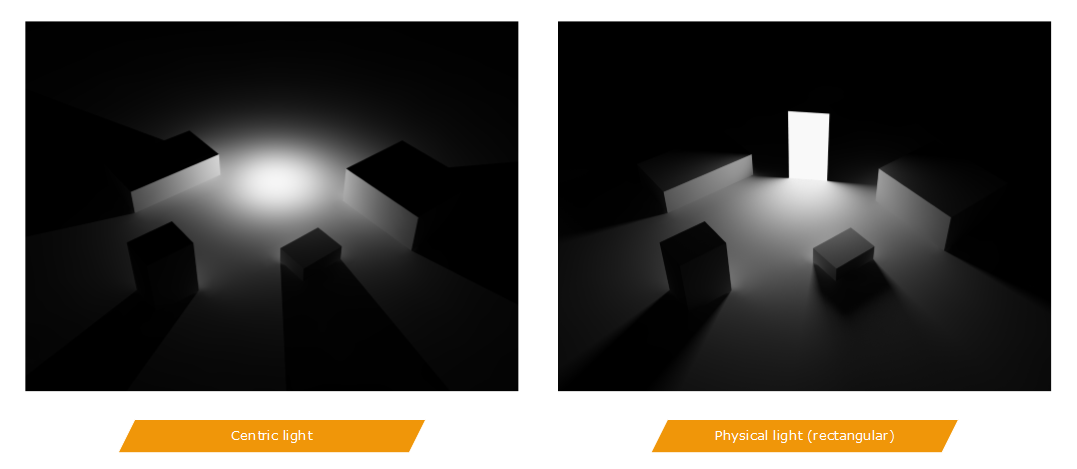
So, a physical light has a shape. Consequently, it produces a much smoother lighting than the one produced by a point light. The image below illustrates this fact:

A centric light produces hard lighting and shadows compared to area lights
To reach a high level of realism, we’ll need to use realistic lights. Of course, there’s no free lunch here…a physical light contribution takes more time to compute than the contribution of a point light; but it’s a necessary step to get realistic looking images.
Please Only Use Physical Lights!
A physical light uses physically correct units. If you look at the RED::IPhysicalLightShape API you’ll see that the lighting intensity of a physical light is set using a luminous flux value or power values in Watts. Non physical lights have no lighting units: unit-less values are supplied instead.
So the two types of lights don’t coexist well in a scene. Either all lights are physical or they aren’t. Any combination of the two will result in bad looking scenes with overbright lights, or lights that are not strong enough.
A physical light has a quadratic decay attenuation, which corresponds to a physically correct decay. It’s NOT equivalent to a 1 / ( distance * distance ) decay that can be set on a non physical point light. A point light using a quadratic decay has an intensity getting infinitely high as the lit point moves toward the light; which is not the case of a physical light.
Among all the lights that exist in HOOPS Luminate, only a few of them are physically correct:
| Non-physical lights | Physical lights |
|---|---|
Ambient light Point light Spot light Directional light Beam light Area light |
Physical light Sun light Sky light |
Using Correct Modelling Units
It’s just a reminder, but an important one: physical lights are setup using physically correct intensities. Therefore, these lights should be used in scenes defined with physically correct units. The RED::IPhysicalLightShape::SetEmitter method uses a ‘iScale’ parameter that defines the conversion between the model units and meters. This is important. If a closed room is 10 kilometers wide instead of 10 meters, a 60 Watts lamp bulb won’t produce anything visible!
Using Shapes for Physical Lights
Realism is the result of a combination of different factors. One of them, besides the real shapes for lamps is to have real light support geometries. Many softwares don’t have the necessary functions to add light supports. Consequently, as we pointed out in the first page of this book, lights may seem to float in the air, which is not good at all for realism.

A few example of light support geometries
Light support geometries models can be purchased for a few dollars or euros on 3d market places. Such meshes should be easy to add in all applications targeting high quality images.

