First App
Introduction
Most of the HOOPS Luminate tutorials are written using the RFK evaluation framework. This is a C++ library providing the minimum set of functionalities to quickly start prototyping with the RED technologies. This is the perfect bootstrap code to let you get your hands on your project without caring too much about the UI and OS dependent stuffs.
The framework owns the application main loop. Your program is therefore mainly composed of callbacks which are called by the framework upon user interactions. It also provides easy ways to create custom commands and arrange them in tool bars or menus to extend the initial set of framework commands.
Initialization
The first step in building an application with the framework is to set user callbacks. This is achieved by associating application events to user functions:
// Set the program callbacks.
RFK::TutorialApplication::SetEventCallback( RFK::EVT_INIT, OnInit );
RFK::TutorialApplication::SetEventCallback( RFK::EVT_MOUSE, DefaultOnMouse );

// Run the application.
return RFK::TutorialApplication::MainLoop( "Tutorial - First application" );
Here we set two callbacks: one called upon application initialization (this is where we’ll perform all our custom initializations) and another one called on mouse interactions. The one for the mouse is provided by the Tools library whose source code is available along with the tutorials ones. Then, we enter the framework main loop.
By default, the framework opens a window with a ready-to-use RED view inside occupying the whole window surface. In our init callback, we start by adding a toolbar with two custom commands: one to take snapshots of the application and another one to go forwards in the tutorial application steps. We also add a menu that reuses one command used in the toolbar. Each command gets its own callback which is called when the command is triggered from the application UI:
RED_RC OnInit( RFK::EventInfo& event, void* param )
{
  // Create and populate a toolbar:
  int cmd_next, cmd_snapshot, tb;
  RC_TEST( RFK::TutorialApplication::AddToolBar( tb, "Main" ) );
  RC_TEST( RFK::TutorialApplication::CreateCommand( cmd_next, "Next step", ":/Framework/next.png", "", OnNextStep ) );
  RC_TEST( RFK::TutorialApplication::AddCommand( tb, cmd_next ) );
  RC_TEST( RFK::TutorialApplication::CreateCommand( cmd_snapshot, "Take a snapshot", ":/Framework/photo.png", "", RFK::TutorialApplication::TakeSnapshot ) );
  RC_TEST( RFK::TutorialApplication::AddCommand( tb, cmd_snapshot ) );

  // Create and populate a menu (reusing the cmd_snapshot):
  int menu, cmd_quit;
  RC_TEST( RFK::TutorialApplication::AddMenu( menu, "&Commands" ) );
  RC_TEST( RFK::TutorialApplication::CreateCommand( cmd_quit, "Quit", "", "", RFK::TutorialApplication::Close ) );
  RC_TEST( RFK::TutorialApplication::AddCommand( menu, cmd_snapshot ) );
  RC_TEST( RFK::TutorialApplication::AddSeparator( menu ) );
  RC_TEST( RFK::TutorialApplication::AddCommand( menu, cmd_quit ) );
Each command receives an optional icon which can be any PNG or JPG file. Additional built-in icons are provided by the framework:
| free_transform.png | next.png | pan.png | |||
| rotate.png | zoom.png | layers.png | |||
| inspector_geometry.png | photo.png | bullet_red.png | |||
| bullet_green.png | bullet_blue.png | processor.png | 
|
||
| shadows.png | 
|
folder.png | 
|
setting_tools.png | 
|
| render.png | 
|
plus_button.png | 
|
help.png | 
|
Those icons can be used by conforming to the following path format: “:/Framework/ file.png/jpg “. Other files are accessed to by giving their full path.
The framework already provides us with a function to take snapshot (the same goes for the close command). So we simply redirect the command trigger to the framework function. For the second command, we provide our own callback. Because commands can be inserted at several places in the application UI (different toolbars, menus) they are first created and then inserted everywhere we need them.
We then add some data to render by loading a .red file and linking it to the application:
// Load the scene.
RED::Object* camera;
unsigned int context;
RC_TEST( RFK::TutorialApplication::LoadREDFile( camera, context, NULL, "../resources/FirstApp.red" ) );

// Set the viewpoint to the application window to render it.
RC_TEST( RFK::TutorialApplication::SetViewpoint( camera ) );
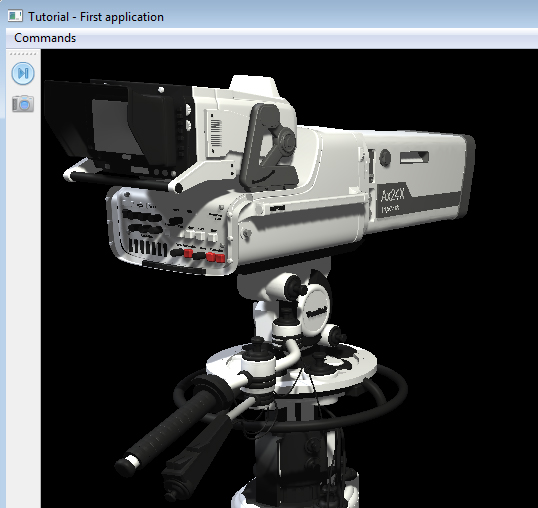
The custom UI and a view of the loaded data.
Finally, because our tutorial is made of only one step, we close the application when the callback gets called:
RED_RC OnNextStep( int iCommandID )
{
  RFK::TutorialApplication::Close();
  return RED_OK;
}
Using the Basic Scene
The source tree of HOOPS Luminate contains a Tools.m module. This module features some quick start services with all source code included. The CreateBasicScene method can be used to initialize a simple model showing up a textured ground plane, which is lit by a spot light casting shadows.
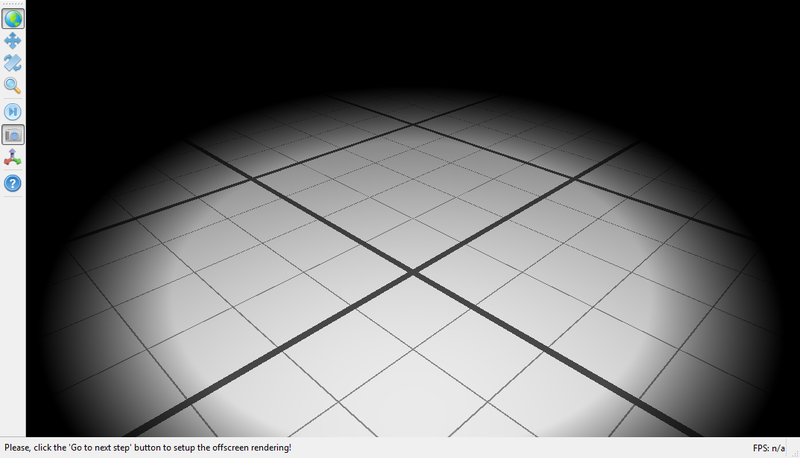
The startup scene created using CreateBasicScene.
Using the Builtin Axis System
Similarly, the Tools.m module contains a three axis system that can be used to visualize the current axis system of the framework camera. The axis system shapes are created using the OnAxisSystem command and the SynchronizeAxisSystem method (which is called automatically if the DefaultOnMouse camera transformation handler is used). Red stands for the X axis, green for the Y axis and blue for the Z axis.

The builtin axis system

