Cube Images
Introduction
A cube image is a 360° image which stores what a perfect spherical camera could see at a given location in space. They are useful in both real-time and photo-realistic rendering situations. In real-time they can be used to simulate reflections at the surface of objects. In photo-realism, cube images are often used as sky light textures. In both cases, cube images are also widely used as backgrounds.
Description
Those images are called cube because you can think of them as being the six faces of a cube stored in a single image.
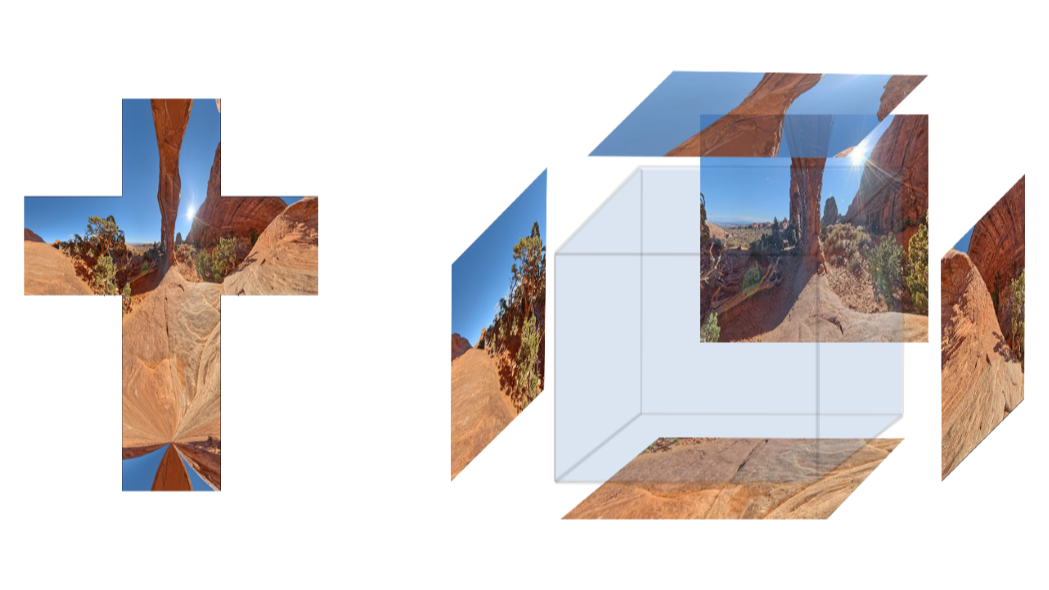
The six faces of a cube image (the front face texture is missing for visual clarity).
Input image files are often horizontal or vertical cross image (as in the figure above) or latitude/longitude images.
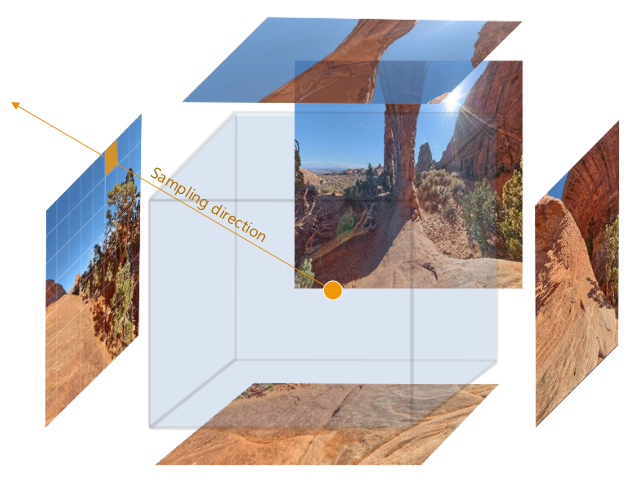
To sample such image, you access to pixels using a 3d vector instead of the more classical (u,v) pair of coordinates. The returned pixel is the one which is intersected by a ray starting from the cube center and going into the provided direction.
Cube Image Creation
Cube images are created the same way other HOOPS Luminate images are:
Creating a Cube Image
RED::Object* image_cube;

// Create the image.
RC_TEST( iresmgr->CreateImageCube( image_cube, iresmgr->GetState() ) );

RED::IImageCube* icube = image_cube->As< RED::IImageCube >();

for( int face = 0; face < 6; ++face )
{
    // Set the content of each cube face.
    RC_TEST( icube->SetFacePixels( face, face_pixels[face], 512, RED::FMT_RGB, iresmgr->GetState() ) );
}
Here, we assume that we have a valid pixel array in ‘face_pixels[face]’, for each of the 6 faces of the cube to process.
There are three methods to set the content a cube image:
Six Faces
Each of the six cube faces is passed to the image via RED::IImageCube::SetFacePixels.
The 6 faces index and orientation are described below, for a camera whose eye position is at the origin:
| Face | Sight | Top | Right |
|---|---|---|---|
| 0 | +X | -Y | -Z |
| 1 | -X | -Y | +Z |
| 2 | +Y | +Z | +X |
| 3 | -Y | -Z | +X |
| 4 | +Z | -Y | +X |
| 5 | -Z | -Y | -X |
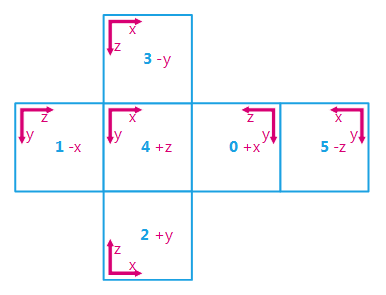
The six faces of the cube and their camera axis
From this definition, we can get the origin and directions of UV mapping coordinates for each face in the cube:
| Face | Heading | Origin | U axis | V axis |
|---|---|---|---|---|
| 0 | +X | (+1,+1,+1) | -Y | -Z |
| 1 | -X | (-1,+1,-1) | +Z | -Y |
| 2 | +Y | (-1,+1,-1) | +X | +Z |
| 3 | -Y | (-1,-1,+1) | +X | -Z |
| 4 | +Z | (-1,+1,+1) | +X | -Y |
| 5 | -Z | (+1,+1,-1) | -X | -Y |
Note
The RED::ShaderString::ConvertUVInCubeFaceVector contains the code performing the conversion between a face number and UV coordinates into a XYZ direction.
Single Image
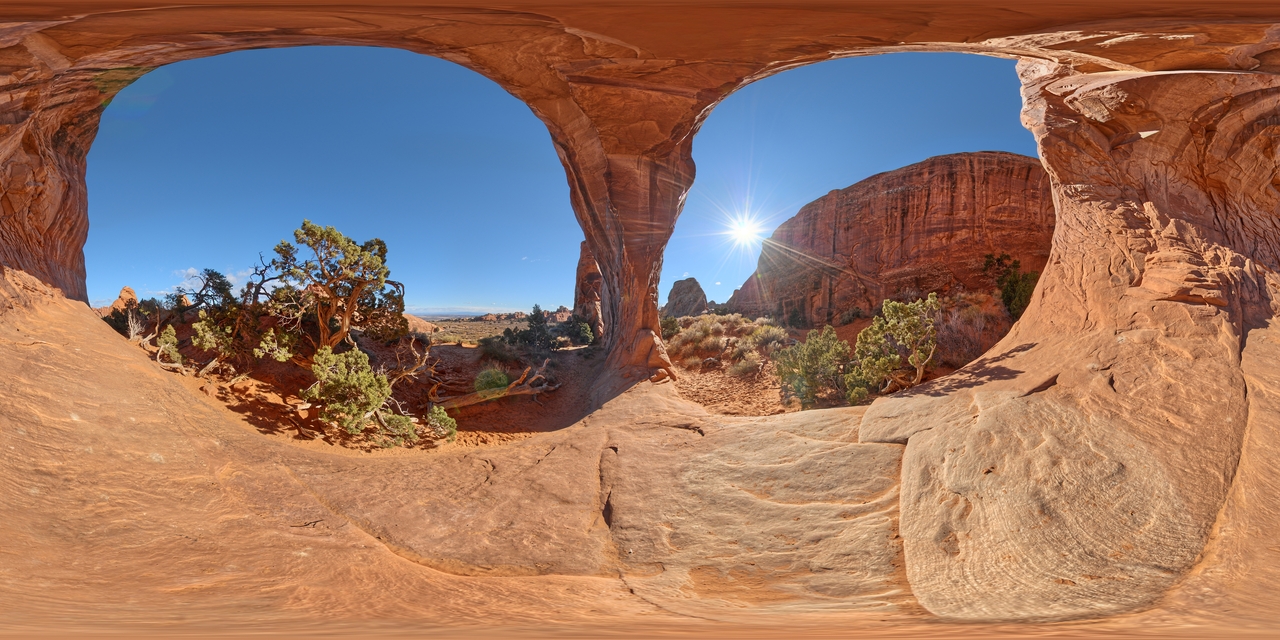
A single image containing the whole data is passed to the image (can be latitude/longitude or cylindrical map) (RED::IImageCube::CreateEnvironmentMap).
- Latitude goes from 0 to pi. Origin is at the bottom of the image.
- Longitude goes from 0 to 2pi. Origin is at the left of the image and correspond to the X positive direction. Rotation is positive, this leads to a 2D map visually inverted compared to its background mapping in the 3D world.
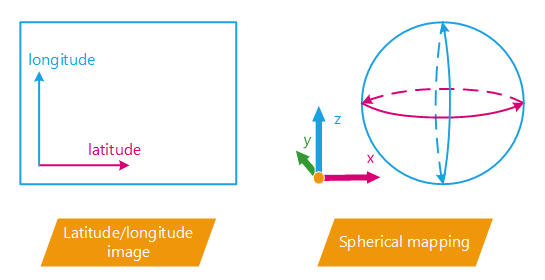
The latitude/longitude image and its mapping information
Engine
The engine renders the content of the cube image automatically using RED::IImageCube::AutoCubeUpdate function.
Using Cube Images for Reflections
Cube images can be used in real-time to render good-looking reflections. Those images are used to capture the environment of objects and later used to estimate the reflection component of object materials.
There are three modes for cube images in HOOPS Luminate:
- Static: the content of the cube image is provided by the user
- Automatic: the content of the cube image is set automatically by rendering the scene once as seen from the image centre
- Dynamic: just as the automatic mode, but the content is updated at each frame (making the texture content reflects the scene changes)
Note
The differences and usages of those modes are demonstrated in the Environmental Mapping tutorial.
Using Cube Images for Backgrounds
One of the other main usage of cube images is background images. As soon as the rendering viewpoint can move, the background image can be 2D anymore and must provide information for any viewing direction. That’s exactly what cube images are good at.
Once you created a cube image, setting it as background is quite easy:
Setting a Background Image
You may set up to two different images as background: one cube image and one optional 2D image. If only the cube image is provided, it’s used for every rendering need (direct or indirect viewing). If an optional 2D image is provided, it overrides the cube image for direct visualization only.
RED::Object* image_cube = NULL;
RED::Object* image_2d = NULL;

// Get the default VRL of the window (win is a pointer to an existing HOOPS Luminate window).
RED::IWindow* iwin = win->As< RED::IWindow >();

RED::Object* vrl;
RC_TEST( iwin->GetDefaultVRL( vrl ) );

// Set the VRL background(s).
RED::IViewpointRenderList* ivrl = vrl->As< RED::IViewpointRenderList >();
RC_TEST( ivrl->SetBackgroundImages( image_cube, RED::Matrix::IDENTITY,
                                    image_2d, RED::Matrix::IDENTITY,
                                    true, 1.0, 1.0, iresmgr->GetState() ) );

