Monte Carlo Sampling
HOOPS Luminate uses sampling methods based on Monte Carlo approximation to solve complex physical problems. We’ll discuss this more in depth in this chapter.
A Word on Monte Carlo Sampling
The resolution of a complex physical phenomenon can rarely be achieved using direct mathematical methods. Equations to solve are just too complex. In computer graphics, it often starts with that sort of things:

A typical lighting equation.
It’s ugly, don’t you think? So this can’t be directly solved. Given the ultimate goal of producing realistic images, rendering engines have to find a way to get approximative results for these evil equations. Monte Carlo based methods offer a good way to achieve our objectives.
In a word, Monte Carlo methods rely on a repeated random sampling to obtain a numerical result (http://en.wikipedia.org/wiki/Monte_Carlo_method). The idea is to take samples, measure each of them and consolidate the sum to get an average numerical estimation of the phenomenon that we’re trying to solve. In computer graphics, this has a lot of applications. If we consider the example of shadow casting from a wide source of light with blocking geometry on the path, Monte Carlo sampling methods provide these results:
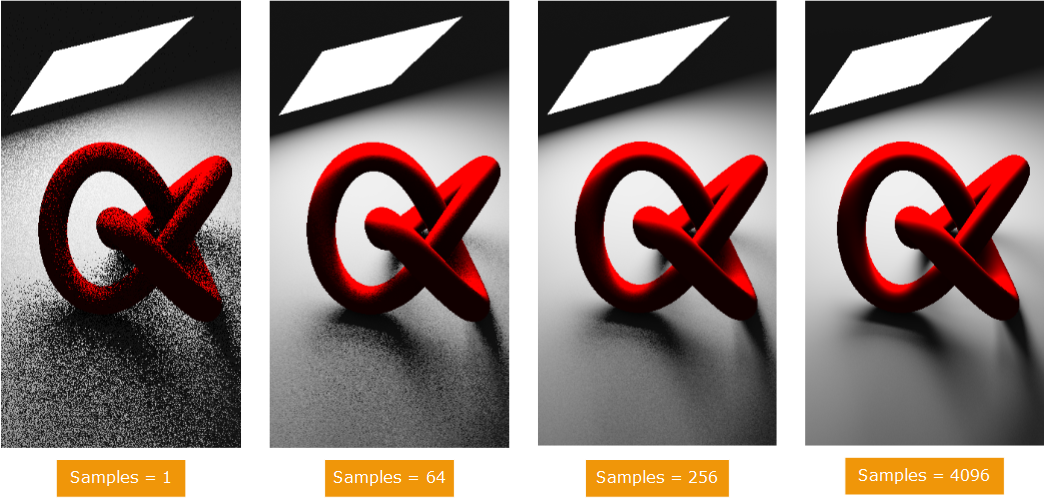
Monte Carlo sampling applied to shadow casting.
More samples mean a more accurate result. Hence the most visible consequence of using Monte Carlo methods for rendering is noise. More samples means less noise in the resulting image, but more samples also means more time needed to render the image. Consequently, all is about choosing the right number of samples for the right quality versus the right performance.
In HOOPS Luminate, there are several phenomena that get sampled using Monte Carlo methods:
- Area lighting and shadowing
- Glossy reflections and refractions
- Global illumination
- Caustics
Sampling Controls in HOOPS Luminate
Global illumination and caustics controls are described in their own chapters each: Global Illumination and Caustics. We’ll review pure ray-tracing controls here:
RED::OPTIONS_RAY_LIGHTS_SAMPLING_RATE: Controls the number of samples taken to calculate a lighting solution for all lights at a given shaded pointRED::OPTIONS_RAY_GLOSSY_SAMPLING_RATE: Controls the number of samples taken to calculate a reflect / refract solution at a given point in the scene
Then, sampling for one or the other effect can be disabled:
RED::OPTIONS_RAY_ENABLE_AREA_SAMPLING: Can be used to turn on or off sampling. Note that if disabled, only one sampling ray is chosenRED::OPTIONS_RAY_ENABLE_GLOSSY_EFFECTS: Can be used to turn on or off glossiness calculation. If disabled, only one sampling ray is chosen
In addition to these controls, some fine tuning of the sampling effects can be performed. On setting the light sampling rate to 0, the number of samples taken for the calculation of the lighting is determined by the number of samples specified in each light. Similarly, on setting the glossiness sampling rate to 0, the number of glossiness samples taken is based on the number of samples defined by the material at the considered point.