Stereoscopy
HOOPS Luminate supports stereoscopic display of its scenes. The stereoscopy is active for all devices that support the OpenGL WGL_STEREO_ARB flag in the setup of their pixel format. Stereoscopic display can only be activated for RED::VPT_PERSPECTIVE cameras.
If you see two images without stereoscopic glasses, it’s time to stop ;-)
Stereoscopy is supported for the RED::IWindow::FrameDrawing pipeline, for all GPU based display orders. All hardware rendering options are supported while in stereo, including:
- Engine Anti-aliasing
- GPU accelerated ray-tracing
- Multiple VRL composition pipeline
Software rendering using RED::IWindow::FrameTracing is not supported with stereoscopy enabled.
There are two operations to perform to enable stereoscopy in HOOPS Luminate:
- Create the first window of the application with stereoscopy turned on
- Setup the appropriate stereo parameters on all the
RED::IViewpointRenderList(s) that have to display stereo data
Enabling Stereoscopic Display at Engine Startup
Stereoscopy MUST be enabled at the creation of the first window. If stereo is not enabled at the application startup, then it won’t be possible to enable stereoscopy at all for the entire life of the application.
Stereoscopy can be enabled using a very simple setup command:
// Enable stereoscopy on the optional RED::WindowRenderInfo class:
RED::WindowRenderInfo winfo;
winfo.SetStereo( true );

// Create a rendering window:
// 'hwnd' must be a valid application HWND pointer, 'width' and 'height' its dimensions.
// 'resmgr' is the cluster's resource manager.
RED::Object* window = RED::Factory::CreateREDWindow( *resmgr, hwnd, width, height, &winfo, rc );
VRL Stereoscopic Setup
To properly setup stereoscopy for the data we want to see in relief, we need to detail a little bit the underlying display process.
Practically, stereoscopic display is achieved by rendering two images: a first image for the left eye and a second image for the right eye. The hardware will then composite these two images for the stereo peripherals that are setup for using with the application: shutter glasses, polarized filters or whatever else appropriate.
To mimic the relief effect that we’re used to see in real life, we’ll need to define two cameras: one for the left eye and the other one for the right eye. We call ‘interaxial distance’ the distance in model units between the two eyes. Then, we define another distance called the ‘screen depth’. This distance defines convergence distance of the two eyes. Practically, this means that an object in the scene which is farther than the convergence distance will appear behind the screen and that an object which is closer than the convergence distance will appear in front of the screen.
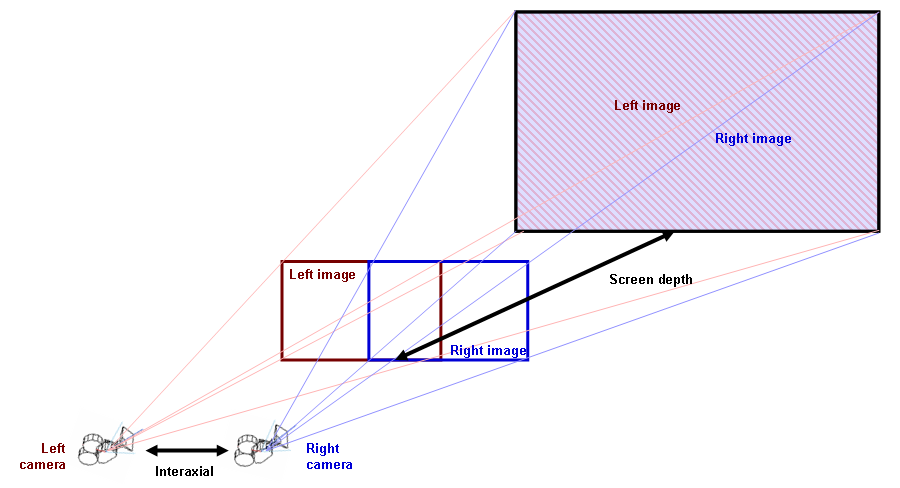
Setup of the two eyes cameras in a stereoscopic display
To visualize the three positions of an object in a stereoscopic scene, let’s look at the following schema:

Parallax error for different objects positions relatively to the screen depth
- Object A generates a negative parallax effect on the screen depth. It’ll appear in front of the screen.
- Object B is on the convergence plane at screen depth. It does not generate any parallax effect and will appear eaxctly lying on the screen.
- Object C is behind the convergence plane and has a positive parallax. It’ll appear behind the screen.
Tuning Stereoscopy
There are several ways of setting up stereoscopy. A few rules can be helpful to tune the stereoscopic effect:
- If the relief effect is not visible enough, increase the interaxial distance until the left / right images are separated enough
- If the scene is popping too much out of the screen, decrease the screen depth distance until the model goes behind the screen. In the same time, it may be needed to decrease the interaxial distance to lower the parallax effects observed
- It’s disturbing to see a model in front of the screen that cuts the window borders. This breaks the relief effect. Similarly, the mouse pointer that appears at the screen depth can alterate the relief effect if the model is in front of the screen. It may be better to setup the model to be behind the screen depth
Enabling Stereoscopy on Auxiliary VRLs
Stereo setup is achieved using RED::IViewpointRenderList::SetStereo, supplying the interaxial and screen depth distance that’ll be used for all cameras of the VRL that is declared to be rendered in stereo. Auxiliary VRLs that are using the eye camera should also be declared as being drawn in stereo. Intermediate VRLs that do filter effects for instance and that don’t use any perspective camera related to the scene to see in stereo should be left unmodified. They’ll be drawn once.
The screen depth distance is silently clamped to the camera near / far clip distances.