Oculus Rift
In this tutorial, you will see how to connect the Oculus Rift virtual reality device to HOOPS Luminate. This allows to visualize and interact with a 3D scene rendered with HOOPS Luminate.
Note
This tutorial uses the Oculus SDK version 1.23.0. The OculusSDK library files provided with it are compiled for Windows with VS2010.
Oculus Rift DK2 device
The scene is composed of several primitives (RED::IMeshShape) and transform nodes (RED::ITransformShape) and a background image (RED::IImageCube). As the scene creation is not the topic of this tutorial, we will skip this part and focus on the Oculus SDK.
Oculus Rift Setup and Functions
Of course, the first thing to do is to purchase the Oculus device on the Oculus VR dedicated website: www.oculus.com.
Once the device is correctly installed on your machine and runs smoothly with the provided samples and demo, we will review the main SDK functions. They can be grouped into four steps:
- Initialization
- Pre-rendering
- Post-rendering
- Shut down
Note
To have further details about the Oculus SDK, please read the developer guide and documentation provided with it.
Initialization
The Oculus system initialization is simple and is done just like this:
// Initialize Rift:
if( OVR_FAILURE( ovr_Initialize( nullptr ) ) )
{
  RFK::TutorialApplication::DisplayError( "Error", "ovr_Initialize: the Oculus API initialization has failed. Exiting now." );
}

// Create the Session object. It is the main interface to the oculus device.
// If the creation is failing, just close the tutorial.
ovrGraphicsLuid luid;
if( OVR_FAILURE( ovr_Create( &g_session, &luid ) ) )
{
  ovr_Shutdown();
  RFK::TutorialApplication::DisplayError( "Error", "ovr_Create: HMD creation has failed. Exiting now." );
}
For each eye, the oculus system needs to create render textures on the GPU. This is done with the ‘ovr_CreateTextureSwapChainGL’ function. The preferred texture sizes for recommended optical field of views are given by the ‘ovr_GetFovTextureSize’ function.
// Get the HMD properties:
ovrHmdDesc hmdDesc = ovr_GetHmdDesc( g_session );

// Create eye render buffers:
for( int eye = 0; eye < 2; ++eye )
{
  // Get useful data: default eye texture size for recommended optical fov:
  g_texSize[eye] = ovr_GetFovTextureSize( g_session, (ovrEyeType)eye, hmdDesc.DefaultEyeFov[eye], 1.0f );

  // Eye rendering data:
  g_eyeRenderDesc[eye] = ovr_GetRenderDesc( g_session, (ovrEyeType)eye, hmdDesc.DefaultEyeFov[eye] );

  // Set the texture swap chain parameters:
  ovrTextureSwapChainDesc desc = {};
  desc.Type = ovrTexture_2D;
  desc.ArraySize = 1;
  desc.Format = OVR_FORMAT_R8G8B8A8_UNORM_SRGB;
  desc.Width = g_texSize[eye].w;
  desc.Height = g_texSize[eye].h;
  desc.MipLevels = 1;
  desc.SampleCount = 1;
  desc.StaticImage = ovrFalse;

  // Create the OVR texture swap chain:
  ovrResult result = ovr_CreateTextureSwapChainGL( g_session, &desc, &g_textureSet[eye] );
}
The last initialization step is to configure the rendering layer.
// Eye level will give tracking poses where the eye height is 0:
ovr_SetTrackingOriginType( g_session, ovrTrackingOrigin_EyeLevel);

// Configure the OVR layer:
g_ovrLayer.Header.Type  = ovrLayerType_EyeFov;
g_ovrLayer.Header.Flags = ovrLayerFlag_TextureOriginAtBottomLeft; // Because OpenGL.

for( int eye = 0; eye < 2; ++eye )
{
  g_ovrLayer.ColorTexture[eye] = g_textureSet[eye];
  g_ovrLayer.Viewport[eye]     = OVR::Recti( g_texSize[eye] );
  g_ovrLayer.Fov[eye]          = hmdDesc.DefaultEyeFov[eye];
  // g_ovrLayer.RenderPose and...
  // g_ovrLayer.SensorSampleTime are updated later per frame.
}
Pre-Rendering
Pre-rendering is the step where we need to get the oculus sensor informations like head position and orientation, eye poses, etc. These data will allow us to setup the tutorial camera. This step is more detailed later on this page.
// Get eye poses, feeding in correct IPD offset:
ovrPosef viewOffset[2];
viewOffset[0] = g_eyeRenderDesc[0].HmdToEyePose;
viewOffset[1] = g_eyeRenderDesc[1].HmdToEyePose;

// Get the current frame timing information:
double time = ovr_GetPredictedDisplayTime( g_session, 0 );

// Get the predicted rendering pose for each eye based on timing:
ovrPosef eyeRenderPose[2];
ovrTrackingState trackingState = ovr_GetTrackingState( g_session, time, ovrTrue );
ovr_CalcEyePoses( trackingState.HeadPose.ThePose, viewOffset, eyeRenderPose );

// Configure the layer:
g_ovrLayer.RenderPose[0] = eyeRenderPose[0];
g_ovrLayer.RenderPose[1] = eyeRenderPose[1];
g_ovrLayer.SensorSampleTime = time;
The eye pose objects contain the eye positional informations.
Post-Rendering
Once the rendering of the scene is done for each eye, we need to send the render textures to the oculus system. Oculus system creates a texture swap chain composed of multiple textures. The first thing to do is to get the current available texture of the swap chain:
// Get the texture swap chain current index:
int currentIndex = 0;
ovr_GetTextureSwapChainCurrentIndex( g_session, g_textureSet[eye], ¤tIndex );
The step of rendering and filling the texture is described later on this page.
Once filled, the textures have to be commited to the Oculus system:
// Commit changes to the textures so they get picked up frame:
ovr_CommitTextureSwapChain( g_session, g_textureSet[eye] );
Finally we have to send the data by calling the ‘ovr_SubmitFrame’ function. Before that, some parameters must be set to enable the system to do the image distortion (to fit the device lenses).
// Oculus SDK distortion rendering:
// --------------------------------

// Set up positional data:
ovrViewScaleDesc viewScaleDesc;
viewScaleDesc.HmdSpaceToWorldScaleInMeters = 1.0f;
viewScaleDesc.HmdToEyePose[0] = g_eyeRenderDesc[0].HmdToEyePose;
viewScaleDesc.HmdToEyePose[1] = g_eyeRenderDesc[1].HmdToEyePose;

ovrLayerHeader* layers = &g_ovrLayer.Header;

// Call SubmitFrame to submit layers for distortion and display to the Oculus Rift:
// This is deprecated since v1.19
// if( OVR_FAILURE( ovr_SubmitFrame( g_session, 0, &viewScaleDesc, &layers, 1 ) ) )
// {
//   RFK::TutorialApplication::DisplayError( "Error", "ovr_SubmitFrame: the Oculus API submit frame has failed." );
// }
// These three function must be called since v1.19 (separated for multithreading purpose):
if( OVR_FAILURE( ovr_WaitToBeginFrame( g_session, 0 ) ) )
{
  RFK::TutorialApplication::DisplayError( "Error", "ovr_WaitToBeginFrame: the Oculus API submit frame has failed." );
}
if( OVR_FAILURE( ovr_BeginFrame( g_session, 0 ) ) )
{
  RFK::TutorialApplication::DisplayError( "Error", "ovr_BeginFrame: the Oculus API submit frame has failed." );
}
if( OVR_FAILURE( ovr_EndFrame( g_session, 0, &viewScaleDesc, &layers, 1 ) ) )
{
  RFK::TutorialApplication::DisplayError( "Error", "ovr_EndFrame: the Oculus API submit frame has failed." );
}
Shut Down
Shuting down the system is quite easy:
// Destroy rift:
ovr_Destroy( g_session );

// Close the Oculus system:
ovr_Shutdown();
Retrieving the Camera Data from the oculus Sensor
During the pre-rendering phase, the sensor data are used to setup the tutorial viewpoint. This is done during the RFK::EVT_UPDATE event.
For each eye, the oculus system gives position, orientation and projection matrix. From position and orientation, we build the view matrix taking into account the coordinate system conversion.
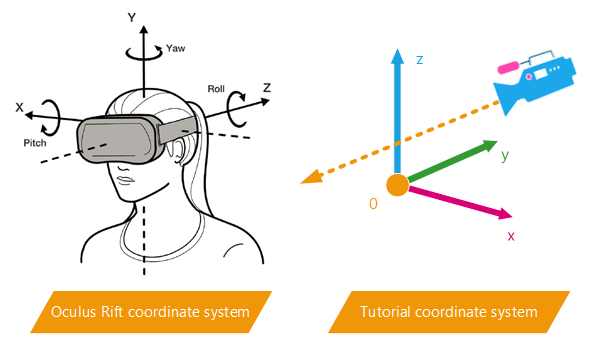
Oculus SDK coordinate system conversion
| Axis | Oculus SDK | Tutorial | Conversion |
|---|---|---|---|
| x | right | left | xtuto = -xoculus |
| y | up | back | ytuto = zoculus |
| z | back | up | ztuto = yoculus |
The conversion matrix is obvious (the 4th column holds the camera position in our virtual scene):
rconv.SetColumn( 0, RED::Vector4( -1.0,  0.0,  0.0, 0.0 ) );
rconv.SetColumn( 1, RED::Vector4(  0.0,  0.0,  1.0, 0.0 ) );
rconv.SetColumn( 2, RED::Vector4(  0.0,  1.0,  0.0, 0.0 ) );
rconv.SetColumn( 3, RED::Vector4(  0.0,  3.0,  0.5, 1.0 ) );
// View matrix:
OVR::Matrix3f view( eyeRenderPose[eye].Orientation );
rview.SetColumn( 0, RED::Vector4( view.M[0][0], view.M[1][0], view.M[2][0], 0.0 ) );
rview.SetColumn( 1, RED::Vector4( view.M[0][1], view.M[1][1], view.M[2][1], 0.0 ) );
rview.SetColumn( 2, RED::Vector4( view.M[0][2], view.M[1][2], view.M[2][2], 0.0 ) );
rview.SetColumn( 3, RED::Vector4( eyeRenderPose[eye].Position.x, eyeRenderPose[eye].Position.y, eyeRenderPose[eye].Position.z, 1.0 ) );
rview = rconv * rview;

// Projection matrix:
OVR::Matrix4f proj = ovrMatrix4f_Projection( hmdDesc.DefaultEyeFov[eye], 0.2f, 1000.0f, 0 );
rproj.SetColumn( 0, RED::Vector4( proj.M[0][0], proj.M[1][0], proj.M[2][0], proj.M[3][0] ) );
rproj.SetColumn( 1, RED::Vector4( proj.M[0][1], proj.M[1][1], proj.M[2][1], proj.M[3][1] ) );
rproj.SetColumn( 2, RED::Vector4( proj.M[0][2], proj.M[1][2], proj.M[2][2], proj.M[3][2] ) );
rproj.SetColumn( 3, RED::Vector4( proj.M[0][3], proj.M[1][3], proj.M[2][3], proj.M[3][3] ) );

// Update eye camera:
RED::IViewpoint* icam = g_camera[eye]->As< RED::IViewpoint >();
RC_TEST( icam->SetViewingMatrix( rview, iresmgr->GetState() ) );
RC_TEST( icam->SetFrustumCustom( rproj, iresmgr->GetState() ) );
Feeding the Oculus Rift with HOOPS Luminate Images
When using the oculus system, a rendering of the scene needs to be done independently for each eye. One way to do this with HOOPS Luminate is to use two RED::IViewpointRenderList objects. This allows to render both eye views during one RED::IWindow::FrameDrawing (or one loop of the RFK::TutorialApplication).
Two auxiliary VRL (RED::IViewpointRenderList) have to be created as well as two cameras (RED::IViewpoint) pointing to the same scene graph.
RC_TEST( iwindow->CreateVRL( g_vrl[eye], g_texSize[eye].w, g_texSize[eye].h, RED::FMT_RGBA, true, iresmgr->GetState() ) );
RED::IViewpointRenderList* ivrl = g_vrl[eye]->As< RED::IViewpointRenderList >();

RC_TEST( ivrl->InsertViewpoint( g_camera[eye], iresmgr->GetState() ) );
RC_TEST( ivrl->SetClearColor( RED::Color::BLACK, iresmgr->GetState() ) );
RC_TEST( ivrl->SetEngineAntiAlias( 2, true, iresmgr->GetState() ) );
The sizes of the VRL are set according to the oculus texture sizes.
Note
We should be careful about huge anti-aliasing because the scene must be rendered two times at a minimum of 75fps (Oculus Rift recommended framerate).
Once the scene rendering is complete (RFK::EVT_RENDER_COMPLETE event), the content of the two VRL is copied in the oculus texture set. This operation must be done in OpenGL.
HDC hdc;
HGLRC hglrc;
unsigned int texid, vrlid;

// Get the Oculus OpenGL texture:
ovr_GetTextureSwapChainBufferGL( g_session, g_textureSet[eye], currentIndex, &texid );

// Access OpenGL texture of the auxiliary VRL buffer:
RED::IViewpointRenderList* ivrl = g_vrl[eye]->As< RED::IViewpointRenderList >();
RC_TEST( ivrl->GetOpenGLInfo( hdc, hglrc, vrlid ) );

// Copy the content of the VRL to the Oculus texture on the GPU:
if( wglMakeCurrent( hdc, hglrc ) == 0 )
  RFK::TutorialApplication::DisplayError( "Error", "wglMakeCurrent: The OpenGL texture copy has failed. Exiting now." );

glBindFramebuffer( GL_FRAMEBUFFER, vrlid );

if( glGetError() != GL_NO_ERROR )
  RFK::TutorialApplication::DisplayError( "Error", "glBindFramebuffer: The OpenGL texture copy has failed. Exiting now." );

glBindTexture( GL_TEXTURE_2D, texid );

if( glGetError() != GL_NO_ERROR )
  RFK::TutorialApplication::DisplayError( "Error", "glBindTexture: The OpenGL texture copy has failed. Exiting now." );

glCopyTexSubImage2D( GL_TEXTURE_2D, 0, 0, 0, 0, 0, g_texSize[eye].w, g_texSize[eye].h );

if( glGetError() != GL_NO_ERROR )
  RFK::TutorialApplication::DisplayError( "Error", "glCopyTexSubImage2D: The OpenGL texture copy has failed. Exiting now." );
Displaying the VRL Content in the Main Window
The last step of the tutorial is to display a feedback of the two renderings in the main window. Oculus system provides a function to create a mirror texture to display: ‘ovr_CreateMirrorTextureGL’. This tutorial doesn’t use it. Instead, the content of the two eye VRL is applied on two quad shapes using only the HOOPS Luminate functions.
A special orthographic viewpoint is created and added to the main VRL. This camera points to two quads positioned on the left and right part of the viewport. Each one textured with the content of its corresponding VRL (using RED::IViewpointRenderList::GetRenderImage) using a simple custom shader.
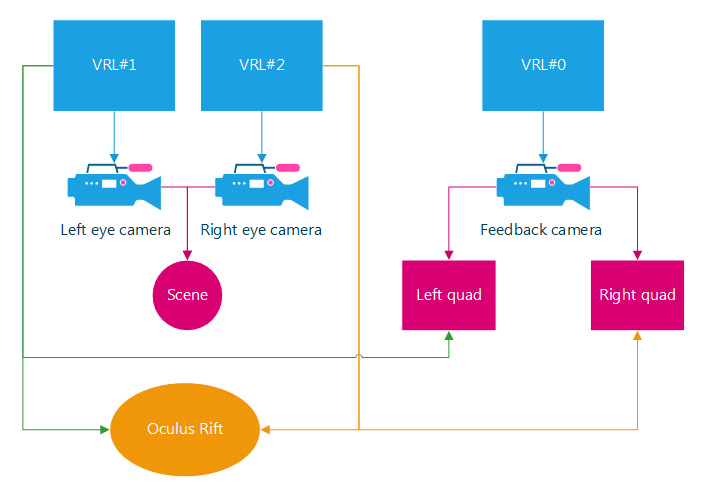
VRL, viewpoints and shapes organization
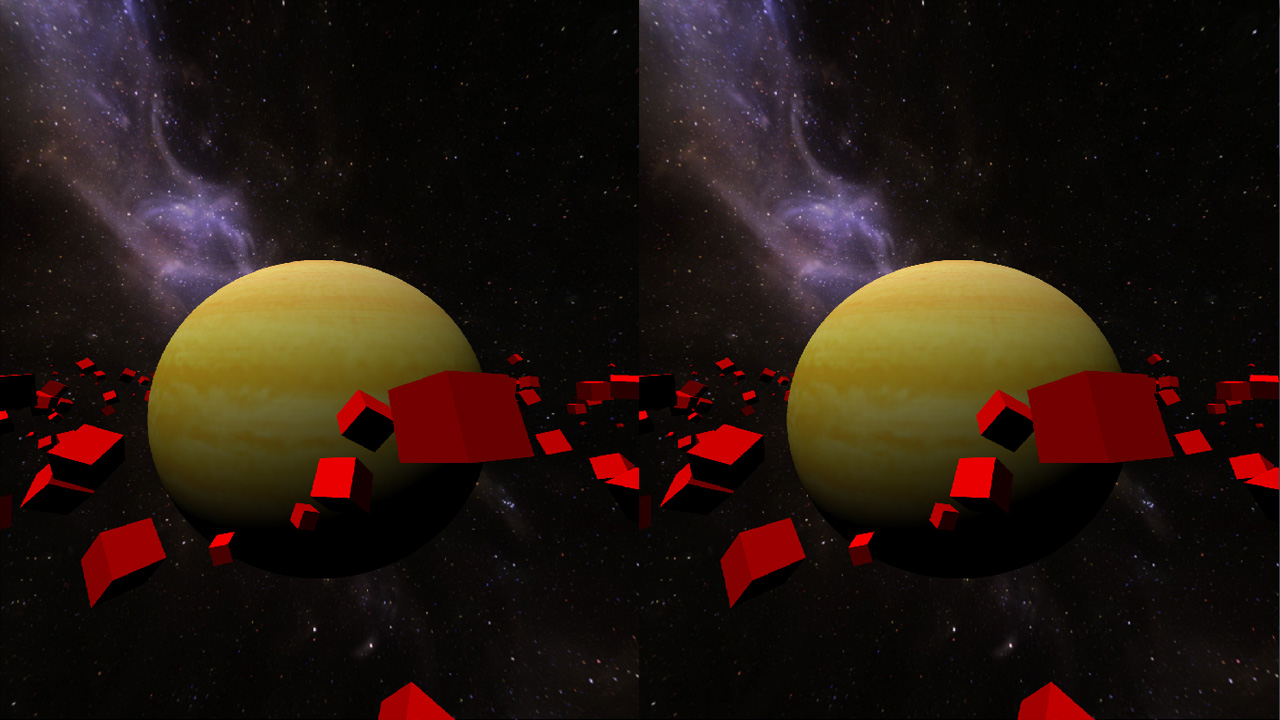
Main window displaying the VRL images for each eye